- ホーム
- Microsoft
- AI-102J - Designing and Implementing a Microsoft Azure AI Solution (AI-102日本語版)
- Microsoft.AI-102J.v2025-07-26.q233
- 質問178
有効的なAI-102J問題集はJPNTest.com提供され、AI-102J試験に合格することに役に立ちます!JPNTest.comは今最新AI-102J試験問題集を提供します。JPNTest.com AI-102J試験問題集はもう更新されました。ここでAI-102J問題集のテストエンジンを手に入れます。
AI-102J問題集最新版のアクセス
「381問、30% ディスカウント、特別な割引コード:JPNshiken」
シミュレーション
米国東部 Azure リージョンに QNA12345678 という名前の QnA Maker サービスを作成する必要があります。
QNA12345678には、以下のサイトで利用可能な質問と回答を使用する知識ベースが含まれている必要があります。
https://support.microsoft.com/en-us/help/12435/windows-10-upgrade-faq.
このタスクを完了するには、Azure Portal と QnA Maker ポータルにサインインします。
米国東部 Azure リージョンに QNA12345678 という名前の QnA Maker サービスを作成する必要があります。
QNA12345678には、以下のサイトで利用可能な質問と回答を使用する知識ベースが含まれている必要があります。
https://support.microsoft.com/en-us/help/12435/windows-10-upgrade-faq.
このタスクを完了するには、Azure Portal と QnA Maker ポータルにサインインします。
正解:
Step 1: Sign in to the Azure portal create and a QnA Maker resource.
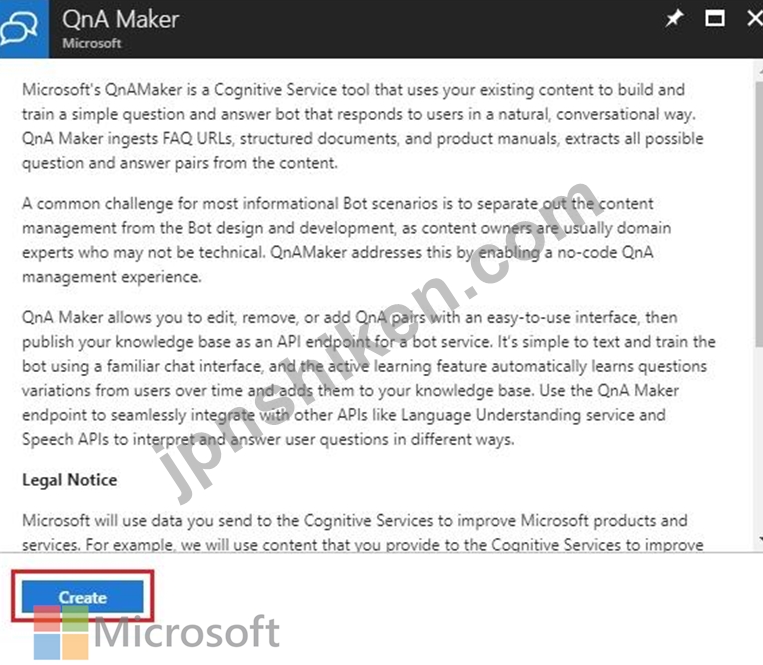
Step 2: Select Create after you read the terms and conditions:
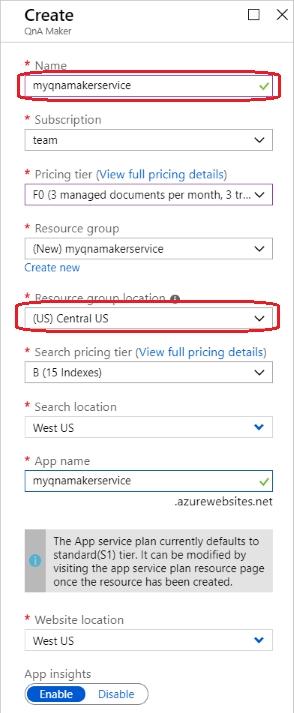
Step 3: In QnA Maker, select the appropriate tiers and regions.
Name: QNA12345678 -
In the Name field, enter a unique name to identify this QnA Maker service. This name also identifies the QnA Maker endpoint that your knowledge bases will be associated with.
Resource Group Location: East US Azure
Step 4: After all the fields are validated, select Create. The process can take a few minutes to complete.
After deployment is completed, you'll see the following resources created in your subscription:
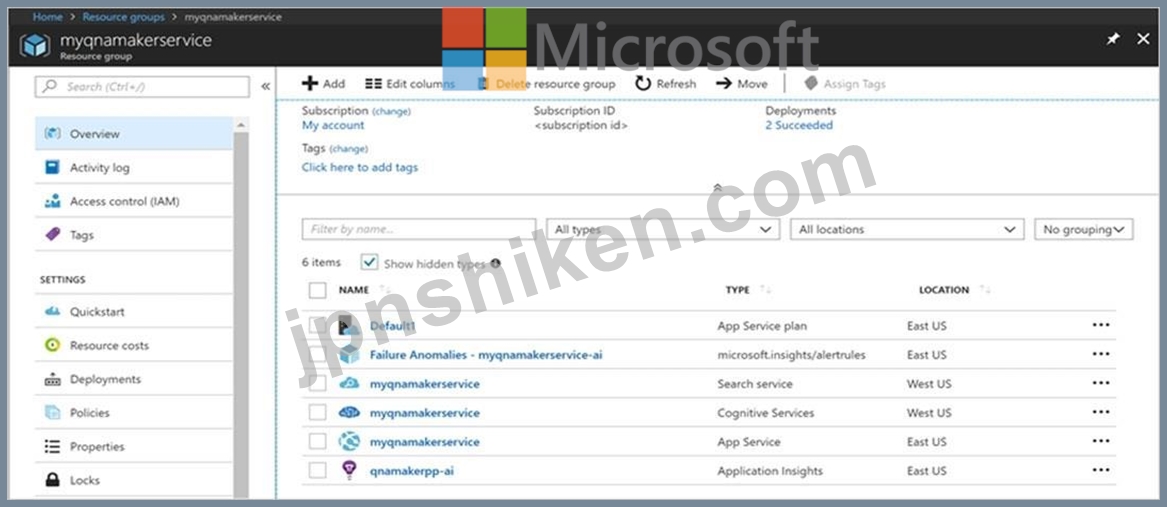
Remember your Azure Active Directory ID, Subscription, QnA resource name you selected when you created the resource.
Step 5: When you are done creating the resource in the Azure portal, return to the QnA Maker portal, refresh the browser page.
Step 6: In the QnA Maker portal, select Create a knowledge base.
Step 7: Skip Step 1 as you already have your QnA Maker resource.
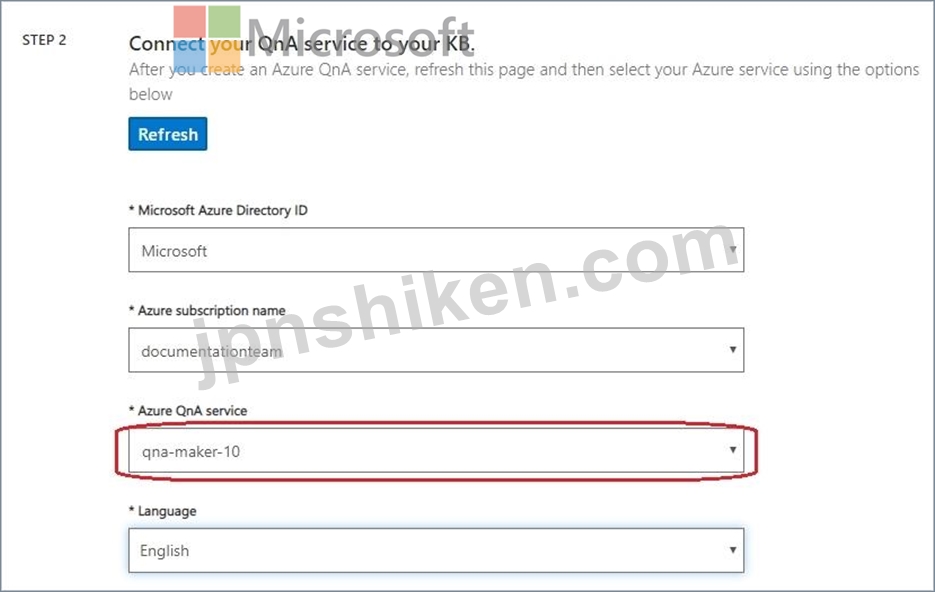
Step 8: In Step 2, select your Active directory, subscription, service (resource), and the language for all knowledge bases created in the service.
Azure QnA service: QNA12345678
Step 9: In Step 3, name your knowledge base
Step 10: In Step 4, configure the following setting:
+ Add URL: https://support.microsoft.com/en-us/help/12435/windows-10-upgrade-faq Step 11: In Step 5, Select Create your KB.
The extraction process takes a few moments to read the document and identify questions and answers.
After QnA Maker successfully creates the knowledge base, the Knowledge base page opens.
Reference:
https://docs.microsoft.com/en-us/azure/cognitive-services/qnamaker/how-to/set-up-qnamaker- service-azure
https://docs.microsoft.com/en-us/azure/cognitive-services/qnamaker/quickstarts/create-publish- knowledge-base
Step 2: Select Create after you read the terms and conditions:
Step 3: In QnA Maker, select the appropriate tiers and regions.
Name: QNA12345678 -
In the Name field, enter a unique name to identify this QnA Maker service. This name also identifies the QnA Maker endpoint that your knowledge bases will be associated with.
Resource Group Location: East US Azure
Step 4: After all the fields are validated, select Create. The process can take a few minutes to complete.
After deployment is completed, you'll see the following resources created in your subscription:
Remember your Azure Active Directory ID, Subscription, QnA resource name you selected when you created the resource.
Step 5: When you are done creating the resource in the Azure portal, return to the QnA Maker portal, refresh the browser page.
Step 6: In the QnA Maker portal, select Create a knowledge base.
Step 7: Skip Step 1 as you already have your QnA Maker resource.
Step 8: In Step 2, select your Active directory, subscription, service (resource), and the language for all knowledge bases created in the service.
Azure QnA service: QNA12345678
Step 9: In Step 3, name your knowledge base
Step 10: In Step 4, configure the following setting:
+ Add URL: https://support.microsoft.com/en-us/help/12435/windows-10-upgrade-faq Step 11: In Step 5, Select Create your KB.
The extraction process takes a few moments to read the document and identify questions and answers.
After QnA Maker successfully creates the knowledge base, the Knowledge base page opens.
Reference:
https://docs.microsoft.com/en-us/azure/cognitive-services/qnamaker/how-to/set-up-qnamaker- service-azure
https://docs.microsoft.com/en-us/azure/cognitive-services/qnamaker/quickstarts/create-publish- knowledge-base

- 質問一覧「233問」
- 質問1 10,000件のPDF文書を含むトレーニングデータセットがあります。...
- 質問2 ホットスポットに関する質問 テキスト処理ソリューションを開発
- 質問3 既存のナレッジベース内の質問に、マルチターンコンテキストを追
- 質問4 試験受験者のライブビデオをキャプチャするアプリがあります。
- 質問5 ドラッグアンドドロップの質問 sa1 という名前のストレージ アカ...
- 質問6 Azure AI Search のインデックス作成用の管理ポータルとして使用...
- 質問7 あなたは旅行代理店用のチャットボットを構築しています。チャッ
- 質問8 次の C# 関数があります。 (Exhibit) 次のコードを使用して関数...
- 質問9 ホットスポットに関する質問 チャットボットで使用する会話フロ
- 質問10 ビデオ会議をキャプチャし、次のアクションを実行するアプリを構
- 質問11 Microsoft Bot Framework SDK を使用してボットを作成します。 ...
- 質問12 ドラッグアンドドロップの質問 AISearch1 という名前の Azure AI...
- 質問13 ホットスポットに関する質問 チャットボットがあります。 ユーザ...
- 質問14 Azure AI Language サービスを使用して機密性の高い顧客データを...
- 質問15 アンケートの感情分析結果を使用してカスタマー サービス スタッ...
- 質問16 ホットスポットに関する質問 文を正しく完成させる答えを選択し
- 質問17 ボットを構築します。 Azure Bot リソースを作成します。 ボット...
- 質問18 ホットスポットに関する質問 言語翻訳を含むアプリケーションを
- 質問19 ホットスポットに関する質問 Microsoft Bot Framework Composer ...
- 質問20 Microsoft Bot Framework SDK と Azure Bot Service を使用して...
- 質問21 ホットスポットに関する質問 画像が 100,000 枚あります。 次の...
- 質問22 Azure AI Language サービス リソースを含む Azure サブスクリプ...
- 質問23 ホットスポットに関する質問 以下の各記述について、正しい場合
- 質問24 ホットスポットに関する質問 Azure AI コンテンツ セーフティ リ...
- 質問25 ホットスポットに関する質問 Azure AI Speech SDK と MP3 エンコ...
- 質問26 ホットスポットに関する質問 何千もの画像を含むライブラリがあ
- 質問27 ホットスポットに関する質問 Resource1 という名前の Azure AI S...
- 質問28 ホットスポットに関する質問 Azure OpenAI リソースを含む Azure...
- 質問29 ホットスポットに関する質問 Computer Vision API の呼び出しか...
- 質問30 企業の Web サイトに公開されているよくある質問 (FAQ) に基づい...
- 質問31 Azure AI Search ソリューションと、カテゴリ フィールドを含む...
- 質問32 電子商取引チャットボット用の会話型言語理解モデルを構築してい
- 質問33 次の形式でデータを保存しています。 (Exhibit) どのフォーマッ...
- 質問34 ホットスポットに関する質問 次の図に示すように、Microsoft Bot...
- 質問35 プログラムで Azure AI サービス リソースを作成するための次の ...
- 質問36 Azure OpenAI リソースを含む Azure サブスクリプションがありま...
- 質問37 あなたの会社には、レポートをページングした植え替えソリューシ
- 質問38 ホットスポットに関する質問 感情分析に使用される Azure AI Lan...
- 質問39 ドラッグアンドドロップの質問 AI1 という名前の Azure OpenAI ...
- 質問40 ホットスポットに関する質問 Resource1 という名前の Azure AI ...
- 質問41 ホットスポットに関する質問 顔認識APIを使用して従業員の顔を認...
- 質問42 インターネットベースのトレーニングソリューションを構築してい
- 質問43 ホットスポットに関する質問 Azure AI エージェント サービスを...
- 質問44 カスタム Azure OpenAI モデルがあります。 次の表に示すファイ...
- 質問45 ホットスポットに関する質問 次の構成の Azure サブスクリプショ...
- 質問46 次の Python メソッドがあります。 (Exhibit) Azureリソースを米...
- 質問47 ドラッグアンドドロップの質問 技術的なポッドキャストの文字起
- 質問48 シミュレーション 必要に応じて次のログイン資格情報を使用しま
- 質問49 ホットスポットに関する質問 Azure AI Search カスタム スキルを...
- 質問50 注: この問題は、同じシナリオを提示する一連の問題の一部です。...
- 質問51 シミュレーション 必要に応じて次のログイン資格情報を使用しま
- 質問52 Microsoft Bot Framework Composer を使用して 5 つのボットを作...
- 質問53 ドラッグアンドドロップの質問 機密文書をスキャンし、Azure AI ...
- 質問54 Azure Stream Analyticsのストリーム処理ジョブでクエリを定義す...
- 質問55 ユーザー画像を共有するアプリを構築しています。 ユーザーが画
- 質問56 テキストファイル、ビデオ、オーディオストリーム、および仮想デ
- 質問57 ドラッグアンドドロップの質問 タスク追跡をサポートするチャッ
- 質問58 ホットスポット Azure サブスクリプションをお持ちです。 Azure ...
- 質問59 AI1 という名前の Azure OpenAI モデルがあります。 Azure OpenA...
- 質問60 スキャンされた請求書の画像 5,000 枚を含むファイル共有があり...
- 質問61 次のデータ ソースがあります。 - 財務: オンプレミスの Microso...
- 質問62 ホットスポットに関する質問 チャットボットを構築しています。 ...
- 質問63 注: この問題は、同じシナリオを提示する一連の問題の一部です。...
- 質問64 ホットスポットに関する質問 文を正しく完成させる答えを選択し
- 質問65 Azure Machine Learning を使用して機械学習モデルをトレーニン...
- 質問66 チャットボットの音声機能を有効にする必要があります。 実行す
- 質問67 ドラッグアンドドロップの質問 小売ドメインを使用して、会社の
- 質問68 ホットスポットに関する質問 Azure サブスクリプションをお持ち...
- 質問69 シミュレーション Text12345678 という名前の Text Analytics サ...
- 質問70 ホットスポットに関する質問 AI1 という名前の Azure OpenAI リ...
- 質問71 ユーザーサポートシステムの言語理解モデルをトレーニングしてい
- 質問72 Microsoft Bot Framework Composer を使用してチャットボットを...
- 質問73 チャットボットを構築しています。 製品のセットアッププロセス
- 質問74 ケーススタディ 2 - Contoso 社 概要 Contoso, Ltd.は、フランス...
- 質問75 ドラッグアンドドロップの質問 工場の生産ラインで製造された不
- 質問76 Windowsサーバー上の共有フォルダーにデータを保存するアプリケ...
- 質問77 ホットスポットに関する質問 フランス語とドイツ語を話す発信者
- 質問78 ホットスポットに関する質問 一般的な AI 用語の定義をユーザー...
- 質問79 Azure サブスクリプションをお持ちです。 Azure OpenAI DALL-E ...
- 質問80 Azure サブスクリプションをお持ちです。 ユーザーが画像を共有...
- 質問81 多言語チャットボットを構築しています。 ポジティブメッセージ
- 質問82 ケーススタディ1 - ワイドワールドインポーターズ 概要 既存の環...
- 質問83 次の表に示すファイルが含まれるコンピューターがあります。 (Ex...
- 質問84 ホットスポットに関する質問 カスタム API を使用して、特定の場...
- 質問85 チャットボットを構築しています。 チャットボットがユーザー入
- 質問86 Azure OpenAI モデルがあります。 モデルを微調整するためのトレ...
- 質問87 Microsoft Power Biページ付けレポートを作成するには何を使用す...
- 質問88 ホットスポットに関する質問 言語学習ソリューションを構築して
- 質問89 Azure AI Search インデックスの物理式を生成するには、テーブル...
- 質問90 ホットスポットに関する質問 米国西部 Azure リージョンでホスト...
- 質問91 ドラッグアンドドロップの質問 Azure AI とカスタムトレーニング...
- 質問92 S0 層の AIdoc1 という名前の Azure AI Document Intelligence ...
- 質問93 Azure サブスクリプションをお持ちです。 ドキュメントの意味的...
- 質問94 Microsoft Bot Framework を使用して構築され、Azure にデプロイ...
- 質問95 ホットスポットに関する質問 言語理解を使用するボットを構築し
- 質問96 ケーススタディ1 - ワイドワールドインポーターズ 概要 既存の環...
- 質問97 会話型言語理解モデルを構築しています。 アクティブラーニング
- 質問98 ホットスポットに関する質問 文を正しく完成させる答えを選択し
- 質問99 Azure AI Languageでカスタムの質問応答プロジェクトを開発しま...
- 質問100 ケーススタディ 2 - Contoso 社 概要 Contoso, Ltd.は、フランス...
- 質問101 ドラッグアンドドロップの質問 発信者の言語で応答できる自動通
- 質問102 分類子を構築するには、Azure AI Custom Vision サービスを使用...
- 質問103 Azure サブスクリプションをお持ちです。このサブスクリプション...
- 質問104 音声サンプルをSpeechStudioプロジェクトにアップロードする必要...
- 質問105 Azure AI Speech サービスを使用するアプリを構築しています。 ...
- 質問106 どのデータベーストランザクションプロパティが、個々のトランザ
- 質問107 注: この問題は、同じシナリオを提示する一連の問題の一部です。...
- 質問108 ホットスポットに関する質問 Azure Resource Manager (ARM) テン...
- 質問109 ドラッグアンドドロップの質問 ドラッグアンドドロップの質問 モ...
- 質問110 ドラッグアンドドロップの質問 音声翻訳を実行する App1 という...
- 質問111 次の Python 関数があります。 (Exhibit) 次のコードを使用して...
- 質問112 ホットスポットに関する質問 次の図に示すように、ユーザーに情
- 質問113 注: この質問は、同じシナリオを示す一連の質問の一部です。この...
- 質問114 ホットスポットに関する質問 遠隔地の学習者向けにインターネッ
- 質問115 ドラッグアンドドロップの質問 Azure AI Speech サービスとカス...
- 質問116 ホットスポットに関する質問 Azure AI Language サービスを使用...
- 質問117 ホットスポットに関する質問 Azure AI Speech SDKを使用してアプ...
- 質問118 CS1 という名前の Azure AI コンテンツ セーフティ リソースを含...
- 質問119 ケーススタディ 2 - Contoso 社 概要 Contoso, Ltd.は、フランス...
- 質問120 既存の Azure AI Search サービスがあります。 画像や PDF とし...
- 質問121 ホットスポットに関する質問 CS1 という名前の Azure AI コンテ...
- 質問122 ホットスポットに関する質問 米国西部 Azure リージョンでホスト...
- 質問123 ドラッグアンドドロップの質問 Face APIの呼び出しを開発してい...
- 質問124 ホットスポットに関する質問 チャットボットの設計をレビューし
- 質問125 ホットスポットに関する質問 Azure サブスクリプションをお持ち...
- 質問126 回転速度、角度、温度、圧力などのエンジン センサー データを分...
- 質問127 bot1という名前の会話型ボットを作成します。 QnAMakerアプリケ...
- 質問128 ホットスポットに関する質問 テキスト処理ソリューションを開発
- 質問129 ホットスポットに関する質問 Resource1 という名前の Azure AI S...
- 質問130 ホットスポットに関する質問 文書は 100,000 件あります。 Azure...
- 質問131 ホットスポットに関する質問 手書きのアンケート回答をスキャン
- 質問132 Azure AI Search ソリューションと、JPEG ファイルとして保存さ...
- 質問133 次のことを実行する言語サービス リソースがあります。 - 感情分...
- 質問134 QA1 という名前の Azure AI Language カスタム質問応答プロジェ...
- 質問135 組織では音声合成を使用していますが、サービスで使用する音声を
- 質問136 次の要件を満たすチャットボットを構築する必要があります。 チ
- 質問137 注: この問題は、同じシナリオを提示する一連の問題の一部です。...
- 質問138 File1.avi という名前の 20 GB のビデオ ファイルを含む Microso...
- 質問139 チャットボットを構築しています。 ナレッジベースを照会するよ
- 質問140 データウェアハウスの主な目的は何ですか?
- 質問141 ケーススタディ 2 - Contoso 社 概要 Contoso, Ltd.は、フランス...
- 質問142 過去 24 時間のセンサー データの異常を検出するソリューション...
- 質問143 ドラッグアンドドロップの質問 開発環境に acvdev という名前の ...
- 質問144 ケーススタディ1 - ワイドワールドインポーターズ 概要 既存の環...
- 質問145 Azure AI Search ソリューションと、ソーシャル メディアの投稿...
- 質問146 コンテンツ管理システムを設計しています。 読解力の低下や学習
- 質問147 シミュレーション https://docs.microsoft.com/en-us/azure/bot-...
- 質問148 Azure AI Language サービスを使用してドキュメントを分析するア...
- 質問149 ドラッグアンドドロップの質問 Web ベースの顧客エージェントの...
- 質問150 Azure AI Speech サービスのテキスト読み上げ機能を利用するアプ...
- 質問151 ホットスポットに関する質問 Azure AI エージェント サービスを...
- 質問152 注: この問題は、同じシナリオを提示する一連の問題の一部です。...
- 質問153 ホットスポットに関する質問 PDF ファイルとして保存されたプレ...
- 質問154 シミュレーション 必要に応じて次のログイン資格情報を使用しま
- 質問155 Azure AI Vision クライアントライブラリを使用するメソッドを開...
- 質問156 ホットスポットに関する質問 Azure AI Custom Vision サービスを...
- 質問157 テキストを音声に変換するソーシャルメディア拡張機能を構築して
- 質問158 ソーシャル メディア メッセージング アプリを構築しています。 ...
- 質問159 会話型言語理解モデルを構築しています。 モデルが次のサンプル
- 質問160 注: この問題は、同じシナリオを提示する一連の問題の一部です。...
- 質問161 ホットスポットに関する質問 Azure AI Translator サービスを使...
- 質問162 ドラッグアンドドロップの質問 Microsoft Bot Framework SDK を...
- 質問163 あなたはチャットボットを構築しています。 ボットが会社の製品
- 質問164 注: この問題は、同じシナリオを提示する一連の問題の一部です。...
- 質問165 ドラッグアンドドロップの質問 食品用の段ボール包装を生産する
- 質問166 Azure AI Document Intelligence を使用してスキャンされたドキ...
- 質問167 ホットスポットに関する質問 テキスト処理ソリューションを開発
- 質問168 リレーショナルデータベースの主な特徴は何ですか?
- 質問169 ホットスポットに関する質問 Azure AI コンテンツ セーフティ ブ...
- 質問170 ホットスポットに関する質問 文を正しく完成させる答えを選択し
- 質問171 Azure AI Translator API を使用するアプリケーションのメソッド...
- 質問172 注:この質問は、同じシナリオを提示する一連の質問の一部です。
- 質問173 ホットスポットに関する質問 Microsoft Bot Framework SDK を使...
- 質問174 ドラッグアンドドロップの質問 Azure AI Language で質問回答プ...
- 質問175 ホットスポットに関する質問 ビデオ トレーニング ソリューショ...
- 質問176 展示に示されているように、Microsoft Bot Framework Composer ...
- 質問177 ローカル ドライブに保存されている File1.avi という名前の 20 ...
- 質問178 シミュレーション 米国東部 Azure リージョンに QNA12345678 と...
- 質問179 1,000 個のビデオ ファイルを含むライブラリがあります。 Azure ...
- 質問180 Azure AI を使用して、ユーザーが性的に露骨な画像を共有するの...
- 質問181 ケーススタディ 2 - Contoso 社 概要 Contoso, Ltd.は、フランス...
- 質問182 ta1 という名前の言語サービス リソースと vnet1 という名前の仮...
- 質問183 ドラッグアンドドロップの質問 Azure Cosmos DB API と適切なデ...
- 質問184 ホットスポットに関する質問 英語(英国)で行われた講義を録画
- 質問185 ドラッグアンドドロップの質問 ドイツ語の Microsoft Word 文書...
- 質問186 Microsoft Bot Framework を使用してボットを構築しています。 ...
- 質問187 ホットスポットに関する質問 Azure AI Language サービスを使用...
- 質問188 コンピューター ビジョン サービスを使用して画像に適切なキャプ...
- 質問189 シミュレーション fr12345678 という名前の Azure AI Document I...
- 質問190 注: この問題は、同じシナリオを提示する一連の問題の一部です。...
- 質問191 製品サポートマニュアルがあります。 マニュアルに基づいた製品
- 質問192 ホットスポットに関する質問 Face API を使用するアプリケーショ...
- 質問193 電子メールと Web チャットの両方を通じて会話型の顧客サポート ...
- 質問194 次のデータ ソースがあります。 - 財務: オンプレミスの Microso...
- 質問195 AI1 という名前の Azure OpenAI リソースを含む Azure サブスク...
- 質問196 ホットスポットに関する質問 Azure AI コンテンツ セーフティ リ...
- 質問197 テキスト入力の意図を識別する Model1 という名前の Azure AI サ...
- 質問198 ドラッグアンドドロップの質問 ボットを構築しています。 Bot Fr...
- 質問199 Azure AI Search の AI エンリッチメント パイプラインを含む Az...
- 質問200 ドラッグアンドドロップの質問 QnA Maker アプリケーションを使...
- 質問201 ホットスポットに関する質問 Azure Custom Vision サービスを使...
- 質問202 予測メンテナンスを実行する予定です。 100台の産業機械から1年...
- 質問203 ホットスポットに関する質問 学生がエッセイの参考文献を見つけ
- 質問204 予測メンテナンスを実行する予定です。 100台の産業機械から1年...
- 質問205 複数の PDF ドキュメントを含む製品ナレッジベースがあります。 ...
- 質問206 機械から一連のデータを受信するAzure IoTハブがあります。以下...
- 質問207 ホットスポットに関する質問 次のアクションを実行する通話処理
- 質問208 シミュレーション 必要に応じて次のログイン資格情報を使用しま
- 質問209 ホットスポットに関する質問 AI1 という名前の Azure OpenAI リ...
- 質問210 印刷されたフォームを管理するモバイル アプリがあります。 関連...
- 質問211 Microsoft Bot Framework SDK を使用してチャットボットを構築し...
- 質問212 ケーススタディ 2 - Contoso 社 概要 Contoso, Ltd.は、フランス...
- 質問213 ドラッグアンドドロップの質問 オブジェクト検出を実行するAzure...
- 質問214 ドラッグアンドドロップの質問 コンテナ ベース イメージを含む ...
- 質問215 ケーススタディ1 - ワイドワールドインポーターズ 概要 既存の環...
- 質問216 シミュレーション 必要に応じて次のログイン資格情報を使用しま
- 質問217 ホットスポットに関する質問 DI1 という名前の Azure AI Documen...
- 質問218 Search1 という名前の Azure AI Search リソースがあります。 Se...
- 質問219 Microsoft Bot Framework SDK を使用してボットを構築します。 ...
- 質問220 アプリは、パリ行きのフライトを検索するなど、指定された都市へ
- 質問221 ホットスポットに関する質問 iOS アプリの一部として展開される...
- 質問222 シミュレーション 必要に応じて次のログイン資格情報を使用しま
- 質問223 AI1 という名前の Azure OpenAI リソースを含む Azure サブスク...
- 質問224 ドラッグアンドドロップの質問 音声翻訳を実行する App1 という...
- 質問225 ホットスポットに関する質問 Azure AI Speech SDK と MP3 エンコ...
- 質問226 ホットスポットに関する質問 ユーザー画像を共有するアプリを構
- 質問227 次のファイルがあります: - ファイル1.pdf - ファイル2.jpg - フ...
- 質問228 社内ドキュメントに Azure AI Search を使用するアプリケーショ...
- 質問229 ケーススタディ1 - ワイドワールドインポーターズ 概要 既存の環...
- 質問230 生産ライン上の不良品を識別するための Azure AI ソリューション...
- 質問231 注: この問題は、同じシナリオを提示する一連の問題の一部です。...
- 質問232 ホットスポットに関する質問 AI1 という名前の Azure OpenAI リ...
- 質問233 ドラッグアンドドロップの質問 Azure サービスをアーキテクチャ...
