クリックして各目標を展開します。 Azureポータルに接続するには、ブラウザーのアドレスバーに「https://portal.azure.com」と入力します。

すべてのタスクの実行が完了したら、[次へ]ボタンをクリックします。
[次へ]ボタンをクリックすると、ラボに戻ることはできません。残りの試験を完了する間、採点はバックグラウンドで行われます。
概観
試験の次のセクションはラボです。このセクションでは、ライブ環境で一連のタスクを実行します。ほとんどの機能はライブ環境と同じように使用できますが、一部の機能(コピーと貼り付け、外部のWebサイトに移動する機能など)は、設計上可能ではありません。
スコアリングは、ラボで述べられたタスクの実行結果に基づいています。つまり、タスクをどのように達成するかは関係ありません。タスクを正常に実行すると、そのタスクのクレジットを獲得できます。
ラボは個別に時間を計られておらず、この試験には、完了する必要のある複数のラボがある場合があります。各ラボを完了するのに必要なだけ時間を使用できます。ただし、時間を適切に管理して、指定された時間内にラボおよび試験の他のすべてのセクションを完了することができるようにする必要があります。
ラボ内の[次へ]ボタンをクリックして作品を送信すると、ラボに戻ることができなくなりますのでご注意ください。
ラボを開始するには
[次へ]ボタンをクリックしてラボを開始できます。
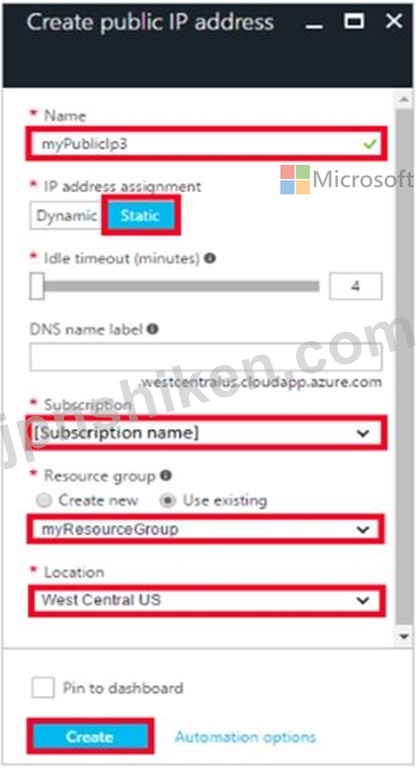
VM1をインターネットからアクセスできるように構成する予定です。
VM1が使用するネットワークインターフェイスにパブリックIPアドレスを追加する必要があります。
Azureポータルから何をすべきですか?
すべてのタスクの実行が完了したら、[次へ]ボタンをクリックします。
[次へ]ボタンをクリックすると、ラボに戻ることはできません。残りの試験を完了する間、採点はバックグラウンドで行われます。
概観
試験の次のセクションはラボです。このセクションでは、ライブ環境で一連のタスクを実行します。ほとんどの機能はライブ環境と同じように使用できますが、一部の機能(コピーと貼り付け、外部のWebサイトに移動する機能など)は、設計上可能ではありません。
スコアリングは、ラボで述べられたタスクの実行結果に基づいています。つまり、タスクをどのように達成するかは関係ありません。タスクを正常に実行すると、そのタスクのクレジットを獲得できます。
ラボは個別に時間を計られておらず、この試験には、完了する必要のある複数のラボがある場合があります。各ラボを完了するのに必要なだけ時間を使用できます。ただし、時間を適切に管理して、指定された時間内にラボおよび試験の他のすべてのセクションを完了することができるようにする必要があります。
ラボ内の[次へ]ボタンをクリックして作品を送信すると、ラボに戻ることができなくなりますのでご注意ください。
ラボを開始するには
[次へ]ボタンをクリックしてラボを開始できます。
VM1をインターネットからアクセスできるように構成する予定です。
VM1が使用するネットワークインターフェイスにパブリックIPアドレスを追加する必要があります。
Azureポータルから何をすべきですか?