- ホーム
- UiPath
- UiPath-ADAv1-JPN - UiPath Automation Developer Associate v1 Exam (UiPath-ADAv1日本語版)
- UiPath.UiPath-ADAv1-JPN.v2025-07-04.q144
- 質問116
有効的なUiPath-ADAv1-JPN問題集はJPNTest.com提供され、UiPath-ADAv1-JPN試験に合格することに役に立ちます!JPNTest.comは今最新UiPath-ADAv1-JPN試験問題集を提供します。JPNTest.com UiPath-ADAv1-JPN試験問題集はもう更新されました。ここでUiPath-ADAv1-JPN問題集のテストエンジンを手に入れます。
UiPath-ADAv1-JPN問題集最新版のアクセス
「384問、30% ディスカウント、特別な割引コード:JPNshiken」
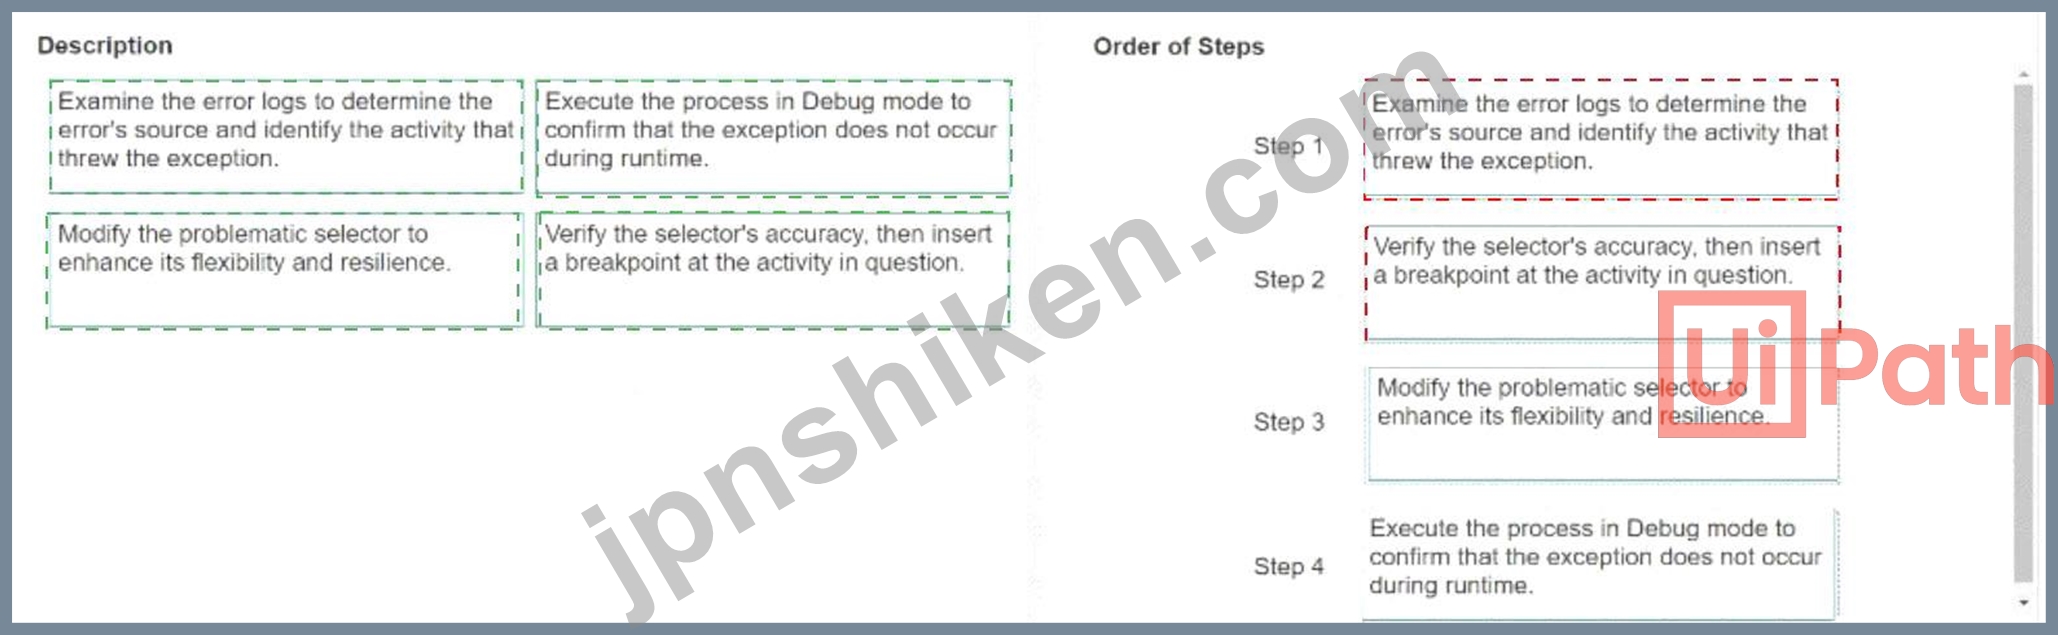
開発フェーズが完了すると、開発者はユーザー受け入れテスト中に、アプリケーション内の Ul 要素に関連付けられたセレクターが変更されたことに気付きます。この中断により、自動化が誤動作し、意図したとおりに動作しなくなります。
UiPath ガイドラインによれば、この問題をデバッグして解決するために開発者が実行すべき適切な一連のアクションは何ですか?
手順: 左側にある説明をドラッグし、右側にある正しいステップにドロップします。

UiPath ガイドラインによれば、この問題をデバッグして解決するために開発者が実行すべき適切な一連のアクションは何ですか?
手順: 左側にある説明をドラッグし、右側にある正しいステップにドロップします。
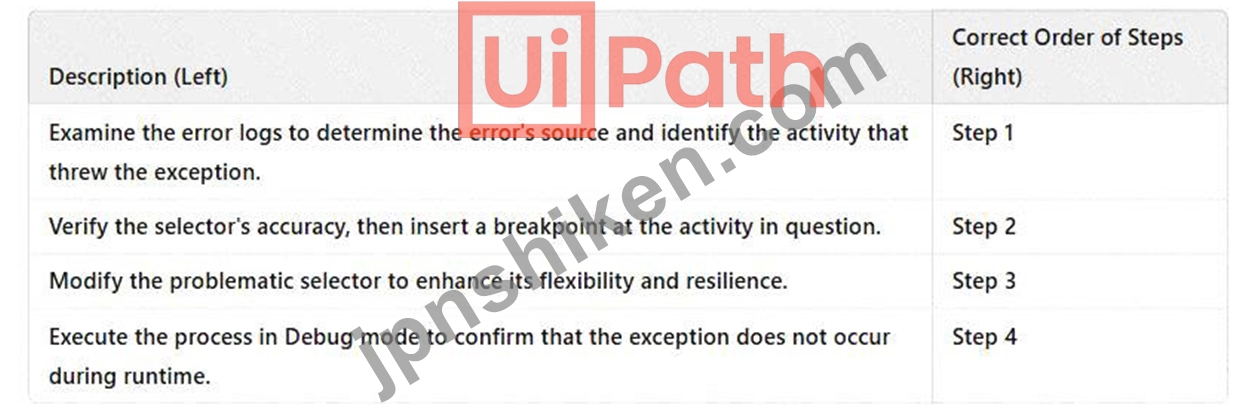
正解:
Explanation:
When a UI element selector changes, it can break automation. The proper debugging sequence ensures an effective fix while preventing future failures.
Step 1: Examine Error Logs
# First, review error logs in the Output Panel to locate the failing activity.
* This helps determine which selector is causing the issue.
* Use UiPath's Exception Details to pinpoint the problem.
Step 2: Verify Selector and Insert Breakpoint
# Open UI Explorer to inspect the failing selector.
* Compare the new selector vs. old selector.
* Use a Breakpoint at the failing activity to analyze execution in Debug Mode.
Step 3: Modify Selector for Flexibility
# Adjust the selector to make it more resilient by:
* Using Wildcards (*) for dynamic attributes.
* Implementing Anchor-based selectors.
* Utilizing Modern UI Automation if applicable.
Step 4: Execute in Debug Mode
# Run the automation in Debug Mode to verify that:
* The updated selector correctly identifies the UI element.
* No further exceptions occur during runtime.
References:
# UiPath Official Documentation - Debugging Workflows# UiPath Best Practices - Handling Selectors# UiPath UI Explorer Guide

- 質問一覧「144問」
- 質問1 自動化実装のプロセス分析フェーズにおける自動化ビジネスアナリ
- 質問2 自動化開発者はビジネスプロセスを理解する上でどのような役割を
- 質問3 UiPath は、同時に実行される複数の実行プロセスの異なる依存関...
- 質問4 ステート マシンを使用する UiPath プロジェクトでは、どのよう...
- 質問5 自動化のプロセスを選択するとき、複雑さが増す要因は何ですか?
- 質問6 静的セレクターと動的セレクターを使用する必要があるのはどのよ
- 質問7 統合サービス用のコネクタ ビルダーを使用してカスタム コネクタ...
- 質問8 プロファイリング セッションをインポートする主な利点は何です
- 質問9 値「03/03/2023 16:23:11」を持つ文字列変数「DateString」を日...
- 質問10 UiPath で線形プロセスを定義するにはどうすればよいでしょうか?...
- 質問11 UiPath Assistant から実行できるアクションはどれですか?...
- 質問12 以下の Excel ファイルのデータ駆動型テスト データを持つ 2 つ...
- 質問13 オンプレミスの UiPath Orchestrator からプロセスを開始すると...
- 質問14 UiPath で REFramework トランザクション プロジェクトを構築す...
- 質問15 Try Catch アクティビティの Catches セクションで、開発者は例...
- 質問16 信頼性と安定性のある自動化を確保するには、ベストプラクティス
- 質問17 開発者は、ワークフロー内のアクティビティの 1 つにブレークポ...
- 質問18 開発者は、Get Asset アクティビティを使用して Orchestrator か...
- 質問19 開発者は人事チーム用のプロセスを作成する必要があります。開発
- 質問20 Anchor Base アクティビティは、アプリケーションとの対話を自動...
- 質問21 開発者は、以下を含む自動化プロセスを作成しました。 (Exhibit)...
- 質問22 開発者は、発注書の自動化プロセスを使用しています。出荷コンテ
- 質問23 「Config.xlsx」ファイルの設定シートと資産シートの違いは何で...
- 質問24 REFramework のどこで TransactionNumber が増加しますか?...
- 質問25 UiPath Studio のシーケンスにアクティビティを挿入している場合...
- 質問26 UiPath Studio プロファイルと比較して、UiPath StudioX プロフ...
- 質問27 [テスト エクスプローラー] パネルのパーセンテージは何を表して...
- 質問28 個人ワークスペースを UiPath Orchestrator のフォルダーに変換...
- 質問29 開発者は、公開されたパッケージを UiPath Orchestrator 2021.10...
- 質問30 UiPath Studio と UiPath StudioX 開発プロファイルの違いは何で...
- 質問31 REST メッセージを構成するときのエンドポイントとは何ですか?...
- 質問32 UiPath エコシステムのどのコンポーネントを使用すると、ユーザ...
- 質問33 アシスタントのクライアント資格情報を使用して、無人ロボットを
- 質問34 開発者は発注書の自動化プロセスを扱っています。出荷されたコン
- 質問35 開発者は REFramework テンプレートを使用してプロセスを自動化...
- 質問36 アプリケーション内のテキスト入力フィールドに使用される Type ...
- 質問37 開発者は、自動化プロセスのために Web アプリケーションのフィ...
- 質問38 開発者は次のタスクを実行するプロセスを作成しました 1 ユーザ...
- 質問39 次のシーケンスがあるとします。 (Exhibit) セル書き込みアクテ...
- 質問40 オブジェクト リポジトリを利用するプロジェクトに取り組んでい
- 質問41 開発者は、Orchestrator にアクセスできる Dispatcher および Pe...
- 質問42 開発者は、Type Into アクティビティのすべての種類の入力メソッ...
- 質問43 ファイルのセットをアーカイブし、電子メールの添付ファイルとし
- 質問44 UiPath Studio バックステージ ビューのどのオプションが、ワー...
- 質問45 Windows レガシー プロジェクトを Windows に変換すると、UiPath...
- 質問46 デバッグ実行の進行中にリモート デバッグ接続を閉じるとどうな
- 質問47 開発者は、「例外時に続行」を有効にしてデバッグ モードで次の
- 質問48 あなたのチームは、Windows、Mac、Linux などのさまざまなシステ...
- 質問49 UiPath Studio を Orchestrator に接続すると何が可能になります...
- 質問50 開発者は String 配列 listOfMonthsByQuarter = {"1", "2", "3"}...
- 質問51 Outlook 365 の電子メール アカウントを監視し、特定の電子メー...
- 質問52 開発者がブレークポイントに到達したときに一時停止状態を調べて
- 質問53 開発者は、Orchestrator にアクセスできる Dispatcher および Pe...
- 質問54 UiPath Studio のステート マシン内の状態を定義するコンポーネ...
- 質問55 呼び出されたワークフローの引数ウィンドウで、3 つの引数 (1 つ...
- 質問56 開発者は、ロボットの実行中にマシンの状態のスクリーンショット
- 質問57 UiPath Studio バージョン 2022.10 以降、Windows 互換性のない...
- 質問58 次の図に示すように、Excel ファイルのデータは「dtEmployee」と...
- 質問59 UiPath Orchestrator キューを利用する利点は何ですか?...
- 質問60 開発者が REFramework を使用してプロセスを実行し、プロセスが ...
- 質問61 開発者は、方向の変更によって影響を受けるテキスト入力フィール
- 質問62 開発者は、GenerateUserlD.xaml との間でデータを受け渡す引数を...
- 質問63 ワークフローでループ本体を実行する前にカウンターの値を評価す
- 質問64 開発者は、PDF レポートからデータをスクレイピングする自動化を...
- 質問65 クリック アクティビティ内で [画面上のターゲットを示す] オプ...
- 質問66 UiPath 自動化プロジェクトで使用される認証情報を安全に保存す...
- 質問67 すべての Get Mail アクティビティの Output プロパティでサポー...
- 質問68 イベント トリガーに設定されるデフォルトのポーリング間隔はど
- 質問69 開発者は、マウス ホバーを表示する必要がある要素をクリックす
- 質問70 リスト型と配列型の違いは何ですか?
- 質問71 次の展示品を確認してください。 (Exhibit) 展示に基づいて、出...
- 質問72 UiPath Orchestrator の役割を説明するものは次のどれですか?...
- 質問73 UiPath Studio で変数を作成するときにオプションとなる変数フィ...
- 質問74 UiPath Orchestrator 内の無人自動化におけるジョブの優先順位の...
- 質問75 ユーザーがアクセス制御に合格するには、次のステートメントのう
- 質問76 開発者は請求書から日付「08-22-2022」を抽出し、それを Extract...
- 質問77 アクティビティを For Each ループに移動すると、アクティビティ...
- 質問78 開発者は UiPath Studio 2021 10 で自動化プロジェクトの作成を...
- 質問79 新しいテスト ケースを作成するとき、テスト ケースの公開後に U...
- 質問80 UiPath Computer Vision ウィザードの領域選択機能を使用すると...
- 質問81 開発者は、DataRow オブジェクトから列の値を取得したいと考えて...
- 質問82 アプリケーションから隠しテキストを取得するには、Get Text ア...
- 質問83 REFramework を使用して構築されたプロジェクトは、従業員のデー...
- 質問84 プロセスでは、DateTime 型の「Timestamp」という変数が使用され...
- 質問85 Orchestrator リクエストを受信し、その信頼性を確認する必要が...
- 質問86 プロセス定義文書 (PDD) は実装方法論のどのフェーズで作成され...
- 質問87 既存の UiPath Studio インストール パッケージに関して正しいの...
- 質問88 テナント > 設定 > 全般で「クラシック フォルダーのアク...
- 質問89 REFrameworkを使用して開発されたプロセスを考えた場合、トラン...
- 質問90 ServiceNow アプリケーションのアプリケーション ファイルとは何...
- 質問91 UiPath Orchestrator キューを利用する利点は何ですか?...
- 質問92 オブジェクト リポジトリを利用するプロジェクトで作業している
- 質問93 ServiceNow ストアとは何ですか?
- 質問94 開発者は、バックグラウンドで実行され、Excel アクティビティを...
- 質問95 Excel アプリケーション スコープ アクティビティが Microsoft E...
- 質問96 UiPath Studio インターフェイスから変数を作成できる有効な領域...
- 質問97 InitAllApplications TestCase を実行するための前提条件は何で...
- 質問98 UiPath Studio からプロジェクトを公開する手順は何ですか? 手順...
- 質問99 ガバナンスの観点から、UiPath を使用して組織内のチームメイト...
- 質問100 開発者は、次の図に示すように、データテーブル dt_Users を作成...
- 質問101 開発者は、Google Chrome 内で UI オートメーションを利用する既...
- 質問102 デフォルトで次の情報が含まれるログ レベルはどれですか? 1. 実...
- 質問103 UiPath の配列とリストの主な違いは何ですか?
- 質問104 次のテーブルは、「dt」という変数に格納されます。 (Exhibit) A...
- 質問105 次のステートメントのうち、ワークフロー内のステート マシンの
- 質問106 次の文のうち、無人オートメーションの特性を正しく説明している
- 質問107 ベスト プラクティスに基づいて、整数値 Mylnteger をログ メッ...
- 質問108 UiPath 統合サービスのコネクタ ビルダーでサポートされているメ...
- 質問109 Web サイト上のエラーにより画像を繰り返し検索する必要性を考慮...
- 質問110 プロセス ワークフローには、不明なシステム例外が発生したとき
- 質問111 開発者は、以下に示すように、Click アクティビティのプロパティ...
- 質問112 数値のみで構成されるパスワード値を保存する場合に推奨される変
- 質問113 開発者は、以下に示すワークフローで使用される 3 つの変数を作...
- 質問114 DataTable を Excel ファイルに書き込む際の、Workbook Write Ra...
- 質問115 開発者は、発注書の自動化プロセスに取り組んでいます。出荷され
- 質問116 開発フェーズが完了すると、開発者はユーザー受け入れテスト中に
- 質問117 開発者は、ベンダー名とアドレスで構成される TransactionData ...
- 質問118 数量値が 500 より大きい DataTable 変数内のすべての行を取得す...
- 質問119 アプリケーション開発者は、レコード プロデューサー UI を使用...
- 質問120 開発者は、Web アプリケーション内で請求書に関連するアイテムを...
- 質問121 開発者は、メモ帳アプリケーションのメニュー バー内のすべての
- 質問122 ステップを記録する前に、App/Web Recorder でどのアクションを...
- 質問123 「Main.xaml」ファイルには、String 型の「In」引数があり、デフ...
- 質問124 アプリケーション アクセスで制御できるデータベース操作はどれ
- 質問125 UiPath Integration Service は自動化開発者にどのようなメリッ...
- 質問126 PDF テキストの読み取りアクティビティを使用して .pdf ファイル...
- 質問127 ベスト プラクティスに基づいて、次のワークフロー名のうち正し
- 質問128 ジョブを手動で開始する場合、UiPath Orchestrator の [ジョブ優...
- 質問129 ワークフローの If アクティビティの機能を正確に説明している記...
- 質問130 開発者は、位置が常に変更されるテキスト入力フィールドに機密情
- 質問131 UiPath リモート ランタイム コンポーネントの主な機能は何です...
- 質問132 開発者は、図に示すように、データ テーブルの作成アクティビテ
- 質問133 UiPath で記述子を作成するときに、UI 要素に複数のアンカーを手...
- 質問134 件名に「UiPath」という単語が含まれるすべての Outlook 電子メ...
- 質問135 実行時にセレクターが特に「名」テキスト フィールドをターゲッ
- 質問136 UiPath 実装方法論では、SDD (ソリューション設計ドキュメント) ...
- 質問137 開発者は、Orchestrator にアクセスできる Dispatcher および Pe...
- 質問138 開発者は、高速な検索を確保しながら、一意の電子メール アドレ
- 質問139 開発者は、「DT」データテーブルの「ID」列の最初の行を文字列変...
- 質問140 「Main.xaml」ファイルの Write Line アクティビティの出力は何...
- 質問141 UiPath Integration Service における接続の役割は何ですか?...
- 質問142 開発者が UiPath Studio で空のプロセスを開始すると、どの依存...
- 質問143 レコードプロデューサーの特徴を特定してください。(3 つの回答...
- 質問144 ステート マシンのレイアウトに関して正しいのは次のどれですか?...

[×]
Download PDF File
Enter your email address to download UiPath.UiPath-ADAv1-JPN.v2025-07-04.q144.pdf