- ホーム
- Microsoft
- SC-300J - Microsoft Identity and Access Administrator (SC-300日本語版)
- Microsoft.SC-300J.v2026-09-22.q168
- 質問43
有効的なSC-300J問題集はJPNTest.com提供され、SC-300J試験に合格することに役に立ちます!JPNTest.comは今最新SC-300J試験問題集を提供します。JPNTest.com SC-300J試験問題集はもう更新されました。ここでSC-300J問題集のテストエンジンを手に入れます。
SC-300J問題集最新版のアクセス
「398問、30% ディスカウント、特別な割引コード:JPNshiken」
会社には contoso.com という名前の Azure Active Directory (Azure AD) テナントがあります。
同社はApp1というWebサービスを開発しています。
App1 が Microsoft Graph を使用して contoso.com 内のディレクトリ データを読み取ることができることを確認する必要があります。
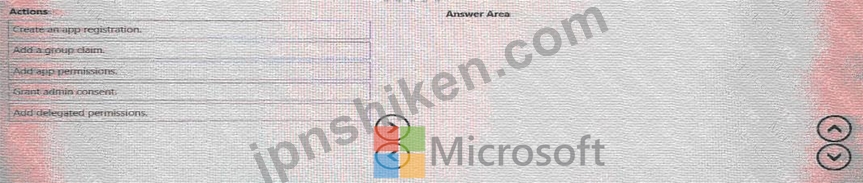
どの 3 つのアクションを順番に実行する必要がありますか? 回答するには、適切なアクションをアクション リストから回答領域に移動し、正しい順序に並べます。
同社はApp1というWebサービスを開発しています。
App1 が Microsoft Graph を使用して contoso.com 内のディレクトリ データを読み取ることができることを確認する必要があります。
どの 3 つのアクションを順番に実行する必要がありますか? 回答するには、適切なアクションをアクション リストから回答領域に移動し、正しい順序に並べます。
正解:

Explanation:
According to the Microsoft SC-300: Identity and Access Administrator Study Guide and Microsoft Learn module "Implement and manage enterprise applications," when developing an application that needs to access Microsoft Graph or other protected APIs on behalf of an organization, you must perform several configuration steps within Azure Active Directory (Azure AD).
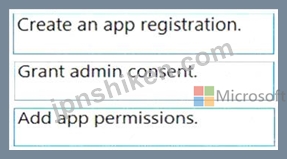
Step 1 - Create an app registration:
Every application that requires access to Microsoft Graph must be registered in Azure AD. The registration process establishes an identity for the app and generates an Application (client) ID and a directory (tenant) ID.
This is done in Azure portal # Azure Active Directory # App registrations # New registration . This enables Azure AD to issue tokens to the app.
Step 2 - Add app permissions:
After registration, you must configure permissions under API permissions in the app's registration settings.
For server-to-server access (no user sign-in), Application permissions are used; for delegated access (on behalf of a user), Delegated permissions are added. In this case, since App1 will read directory data from Microsoft Graph, you assign the Microsoft Graph # Directory.Read.All permission.
Step 3 - Grant admin consent:
Application permissions require admin consent before the app can access directory data. An Azure AD administrator must grant these permissions by selecting "Grant admin consent for contoso.com." This allows the app to use the permissions organization-wide.
From Microsoft's documentation:
"To enable an application to call Microsoft Graph, register the app, configure required API permissions, and grant admin consent for those permissions."
# Correct Answer Order:
* Create an app registration
* Add app permissions
* Grant admin consent

- 質問一覧「168問」
- 質問1 User1 という名前のユーザーを含む Microsoft Entra テナントが...
- 質問2 Azure Active Directory (Azure AD) テナントに、User1、User2、...
- 質問3 次の表に示すリソースを含む Azure サブスクリプションがありま...
- 質問4 ネットワークには、contoso.com というオンプレミスの Active Di...
- 質問5 Microsoft 365 E5 サブスクリプションがあり、そこには User1 と...
- 質問6 次の表に示すユーザーを含む Microsoft 365 サブスクリプション...
- 質問7 User1 と User2 という 2 人のユーザーを含む Azure AD テナント...
- 質問8 タスク3 LinkedlnアプリケーションをSales and Marketingアクセ...
- 質問9 タスク8 Microsoft Entra ID への認証時に、すべてのユーザーが...
- 質問10 注: この問題は、同じシナリオを提示する一連の問題の一部です。...
- 質問11 Microsoft 36S テナントがあります。 高リスク国のリストを含む...
- 質問12 ネットワークには、contoso.com というオンプレミスの Active Di...
- 質問13 Microsoft 365 E5 サブスクリプションがあり、その中に Site1 と...
- 質問14 contoso.comという名前のAzureActive Directory(Azure AD)テナ...
- 質問15 注:この質問は、同じシナリオを提示する一連の質問の一部です。
- 質問16 Azure ADテナントをお持ちの場合 ユーザーの同意設定を構成して...
- 質問17 次の表に示すユーザーを含む Azure AD テナントがあります。 (Ex...
- 質問18 次の表に示すユーザーを含む Azure AD テナントがあります。 (Ex...
- 質問19 Department1 という名前の管理単位を含む Azure Active Director...
- 質問20 contoso.comという名前のAzureActive Directory(Azure AD)テナ...
- 質問21 次の表に示すユーザーを含む Azure AD テナントがあります。 (Ex...
- 質問22 Azure サブスクリプションがあります。このサブスクリプションに...
- 質問23 Microsoft 365 テナントがあります。 認証情報が漏洩したユーザ...
- 質問24 最近のセキュリティ インシデントの問題を解決する必要がありま
- 質問25 Admin1 という名前のユーザーを含む Azure AD テナントがありま...
- 質問26 オンプレミスの Linux デバイスがあります。 Microsoft 365 E5 ...
- 質問27 Microsoft 365 E5 サブスクリプションをお持ちです。 アプリ ガ...
- 質問28 次のクラウド プラットフォームのアカウントがあります。 * アズ...
- 質問29 Microsoft 365 テナントがあります。 Microsoft Entra ID で、利...
- 質問30 Microsoft 365 テナントがあります。 現在、基本認証を使用する...
- 質問31 次の表に示すユーザーを含む Microsoft Entra テナントがありま...
- 質問32 Microsoft365テナントがあります。 すべてのユーザーは携帯電話...
- 質問33 次の表に示すユーザーを含む Azure Ad テナントがあります。 (Ex...
- 質問34 営業部門のユーザーの問題を解決する必要があります。Azure ADテ...
- 質問35 既定のドメイン名 contosso.com を使用するように新しい Microso...
- 質問36 contoso.com の SMTP アドレス スペースを使用する Microsoft Ex...
- 質問37 Microsoft 365 テナントがあります。 すべてのユーザーは携帯電...
- 質問38 Sub1 という名前の Azure サブスクリプションがあります。 Micro...
- 質問39 Site! という名前の Microsoft SharePoint Online サイトが含ま...
- 質問40 Microsoft 365 E5 テナントがあります。 App1 という名前のクラ...
- 質問41 Microsoft 365 E5 サブスクリプションをお持ちです。 Microsoft ...
- 質問42 次の表に示すカスタム ロールを含む Azure サブスクリプションが...
- 質問43 会社には contoso.com という名前の Azure Active Directory (Az...
- 質問44 RemoteNetworkl と RemoteNetwork2 という名前の 2 つのリモート...
- 質問45 Azure サブスクリプションをお持ちです。 Azure AD ログは Log A...
- 質問46 Group3 というグループと Department1 という管理単位を含む Mic...
- 質問47 storage1 という名前のストレージ アカウントと WebApp1 という...
- 質問48 次の表に示すユーザーを含むAzureActive Directory(Azure AD)...
- 質問49 Log Analytics ワークスペースを作成します。 監査の技術要件を...
- 質問50 Azure Active Directory (Azure AD) テナントがあります。 テナ...
- 質問51 セキュリティの既定値が無効になっている Azure Active Director...
- 質問52 Microsoft 365 E5 サブスクリプションと Azure サブスクリプショ...
- 質問53 Microsoft 365 テナントがあります。 条件付きアクセス ポリシー...
- 質問54 Microsoft Office 365 EnterpriseE3ライセンスが割り当てられて...
- 質問55 contoso.com という名前の Azure Active Directory (Azure AD) ...
- 質問56 ヘルプデスク管理者によるライセンス管理の技術要件を満たす必要
- 質問57 あなたの会社にはMicrosoft365テナントがあります。 同社には300...
- 質問58 Automation1 という名前の Azure Automation アカウントと、Vaul...
- 質問59 Microsoft 365 テナントがあります。 すべてのユーザーは、Micro...
- 質問60 Contoso, Ltd.という会社に勤務しており、contoso.comというMicr...
- 質問61 5,000人のユーザーがいるMicrosoft 365テナントがあります。その...
- 質問62 Microsoft365テナントがあります。 Azure Active Directory(Azu...
- 質問63 Sub1 という名前の Azure サブスクリプションがあり、そこには R...
- 質問64 新しい Microsoft 365 E5 テナントを作成します。 ユーザーが匿...
- 質問65 contoso.com という名前の Azure AD テナントがあり、このテナン...
- 質問66 AU1 という管理単位を含む Microsoft Entra テナントがあります...
- 質問67 Azure サブスクリプションをお持ちです。 エンタイトルメント管...
- 質問68 User1 というユーザーが、次の誤ったパスワードを入力してテナン...
- 質問69 App1 の計画された変更と技術要件を満たす必要があります。 何を...
- 質問70 You have a Microsoft Entra tenant that contains the groups s...
- 質問71 RG1 と RG2 という 2 つのリソース グループと、storage1 という...
- 質問72 ユーザー ID が侵害される可能性に関する技術要件を満たす必要が...
- 質問73 Microsoft 365 サブスクリプションをお持ちです。 ユーザーが企...
- 質問74 あなたの会社は最近、Azure Active Directory(Azure AD)特権ID...
- 質問75 展示に示されているように、Azure Active Directory(Azure AD)...
- 質問76 管理要件を満たすには、LWGroup1 グループを作成する必要があり...
- 質問77 Microsoft 365 E5 サブスクリプションと Azure サブスクリプショ...
- 質問78 Group! と Group2 という 2 つのグループと、次の表に示すユーザ...
- 質問79 Sub1 ilia1 というAzureサブスクリプションがあり、そこには sto...
- 質問80 App1という名前のAzureADエンタープライズアプリケーションを含...
- 質問81 ネットワークには、Azure Active Directory (Azure AD) テナント...
- 質問82 次の表に示すユーザーを含むハイブリッド Microsoft 365 サブス...
- 質問83 次の表に示すリソースを含む Azure サブスクリプションがありま...
- 質問84 Microsoft Entra テナントには、User1、User2、User3 という名前...
- 質問85 A Datum から新規ユーザーにライセンスを割り当てる必要がありま...
- 質問86 Microsoft 365 テナントがあります。 Azure Monitor を使用して...
- 質問87 A Datumユーザー向けのライセンスを特定する必要があります。ソ...
- 質問88 注:この質問は、同じシナリオを提示する一連の質問の一部です。
- 質問89 User1 という名前のユーザーと App1 という名前の登録済みアプリ...
- 質問90 新しい Azure AD テナントをデプロイする予定です。 テナントに...
- 質問91 注:この質問は、同じシナリオを提示する一連の質問の一部です。
- 質問92 Azure AD Identity Protection を使用し、次の表に示すリソース...
- 質問93 注:この質問は、同じシナリオを提示する一連の質問の一部です。
- 質問94 Microsoft 365 E5 サブスクリプションをお持ちです。 ユーザー ...
- 質問95 User1 という名前のユーザーが Microsoft Defender for Cloud Ap...
- 質問96 Active Directoryフォレストと同期するAzure Active Directory (...
- 質問97 次の表に示すオブジェクトを含むAzureActive Directory(Azure A...
- 質問98 Microsoft Entra ID P1 ライセンスを持つ Microsoft Entra テナ...
- 質問99 次の表に示すユーザーを含む Azure AD テナントがあります。 (Ex...
- 質問100 Microsoft 365 E5 サブスクリプションがあります。 ユーザーは、...
- 質問101 組織データへのアプリケーションアクセスに関して計画されている
- 質問102 Azure AD テナントがあります。 App1 という名前の新しいエンタ...
- 質問103 Sub1 という名前の Azure サブスクリプションがあります。 Micro...
- 質問104 次の表に示すユーザーを含む Microsoft Entra テナントがありま...
- 質問105 Azure Active Directory(Azure AD)テナントがあります。 過去...
- 質問106 認証要件とアクセス要件を満たすには、オンプレミス アプリケー
- 質問107 次の表に示すユーザーを含む Azure AD テナントがあります。 (Ex...
- 質問108 Azure AD テナントがあります。 テンプレート ファイルをアップ...
- 質問109 Azure Active Directory Premium Plan 2 ライセンスを持つ Azure...
- 質問110 Contoso という Azure AD テナントがあり、Terms1 という利用規...
- 質問111 次の表に示すユーザーを含む Microsoft Entra テナントがありま...
- 質問112 Azure AD テナントと App1 という名前の .NET Web アプリがあり...
- 質問113 ActiveDirectoryドメインに同期するAzureActive Directory(Azur...
- 質問114 次の表に示す Azure Active Directory (Azure AD) ユーザーを作...
- 質問115 会社には Microsoft 365 テナントがあります。 すべてのユーザー...
- 質問116 次の表に示すリソースを含む Azure サブスクリプションがありま...
- 質問117 タスク7 サインイン試行が 10 回失敗したら、アカウントを 5 分...
- 質問118 注: この問題は、同じシナリオを提示する一連の問題の一部です。...
- 質問119 次の表に示すユーザーを含む Microsoft Entra テナントがありま...
- 質問120 次の表に示すリソースを含む Azure サブスクリプションがありま...
- 質問121 お客様は、Group1とGroup2という2つのグループを含むMicrosoft 3...
- 質問122 ネットワークには、Azure AD テナントと同期するオンプレミスの ...
- 質問123 次のオブジェクトを含むAzureActive Directory(Azure AD)テナ...
- 質問124 Microsoft Entra テナントがあります。 テナントへの管理アクセ...
- 質問125 Azure サブスクリプションをお持ちです。このサブスクリプション...
- 質問126 Azure Active Directory (Azure AD) に登録されている、App1 と...
- 質問127 db1 という名前の Azure SQL データベースを含む Azure サブスク...
- 質問128 Microsoft 365 サブスクリプションがあり、その中に Site1 とい...
- 質問129 Microsoft 365 テナントがあります。 資格情報が漏洩したユーザ...
- 質問130 あなたの会社には、Contoso East と Contoso West という名前の ...
- 質問131 次の表に示すユーザーを含む Azure AD テナントがあります。 (Ex...
- 質問132 ネットワークには、Microsoft Entraテナントと同期するオンプレ...
- 質問133 Microsoft Entra テナントがあります。 次の表に示すエンドユー...
- 質問134 条件付きアクセス ポリシーを使用する Azure Active Directory (...
- 質問135 Microsoft 365 E5 テナントがあります。 App1 という名前のクラ...
- 質問136 ネットワークには、Azure AD テナントと同期するオンプレミスの ...
- 質問137 あなたの会社には、次の表に示すユーザーを含む Azure AD テナン...
- 質問138 米国東部 Azure リージョンに Managed1 というユーザー割り当て...
- 質問139 Microsoft 365 E5 サブスクリプションをご利用です。このサブス...
- 質問140 注: この質問は、同じシナリオを示す一連の質問の一部です。この...
- 質問141 注: この問題は、同じシナリオを提示する一連の問題の一部です。...
- 質問142 Microsoft Defender for Cloud Apps および Yammer を使用する M...
- 質問143 contoso.com という Microsoft Entra テナントにリンクされた Az...
- 質問144 Microsoft Entra テナントがあります。 セルフサービス パスワー...
- 質問145 User1 という名前のユーザーと Vault1 という名前の Azure Key V...
- 質問146 Azure サブスクリプション、Google Cloud Platform (GCP) アカウ...
- 質問147 Package1 という名前のアクセス パッケージと User1 という名前...
- 質問148 注: この質問は、同じシナリオを示す一連の質問の一部です。この...
- 質問149 あなたは、Automation1という名前のAzure Automationアカウント...
- 質問150 SSPR の計画された変更を実装します。 User3 が SSPR を使用しよ...
- 質問151 次の表に示すユーザーを含む Microsoft Entra テナントがありま...
- 質問152 User! という名前のユーザーと、RG1 および RG2 という名前の 2 ...
- 質問153 お客様のMicrosoft Entraテナントには、以下の表に示すユーザー...
- 質問154 ADatumユーザーを同期する必要があります。ソリューションは技術...
- 質問155 ユーザーが 70 歳以上のサインイン アラートをトリガーしたとき...
- 質問156 Windows Server を実行する Server! という名前のオンプレミス ...
- 質問157 お客様は、Groups1、Group2、Group3という名前の3つのグループと...
- 質問158 fabrikam.comという名前のドメインを使用するMicrosoft365テナン...
- 質問159 計画された変更をサポートし、MFA の技術要件を満たす必要があり...
- 質問160 contoso.com という名前の Azure Active Directory (Azure AD) ...
- 質問161 お客様は、User1、User2、User3 という名前の 3 人のユーザーと...
- 質問162 次の表に示すグループを含む Azure AD テナントがあります。 (Ex...
- 質問163 次の表に示すユーザーを含む Azure AD テナントがあります。 (Ex...
- 質問164 Microsoft 365 E5 サブスクリプションがあります。 Microsoft De...
- 質問165 App1という名前のAzureADエンタープライズアプリケーションを含...
- 質問166 contoso.com という Microsoft Entra テナントがあり、このテナ...
- 質問167 VM1 という名前の仮想マシンと Vault1 という名前の Azure Key V...
- 質問168 contoso.comのデフォルトドメイン名を使用するように新しいMicro...
