- ホーム
- Microsoft
- MS-102J - Microsoft 365 Administrator (MS-102日本語版)
- Microsoft.MS-102J.v2025-03-25.q225
- 質問126
有効的なMS-102J問題集はJPNTest.com提供され、MS-102J試験に合格することに役に立ちます!JPNTest.comは今最新MS-102J試験問題集を提供します。JPNTest.com MS-102J試験問題集はもう更新されました。ここでMS-102J問題集のテストエンジンを手に入れます。
MS-102J問題集最新版のアクセス
「572問、30% ディスカウント、特別な割引コード:JPNshiken」
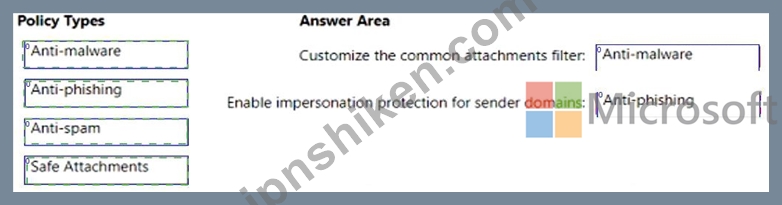
Microsoft Defender for Office 365 を使用する Microsoft 365 サブスクリプションを持っています。
次の要件を満たすようにポリシーを構成する必要があります。
共通添付ファイルフィルターをカスタマイズします。
送信者ドメインの偽装保護を有効にします。
各要件に対してどのタイプのポリシーを構成する必要がありますか?回答するには、適切なポリシー タイプを正しい要件にドラッグします。各ポリシー タイプは、1 回だけ使用することも、複数回使用することも、まったく使用しないこともできます。コンテンツを表示するには、ペイン間で分割バーをドラッグするか、スクロールする必要がある場合があります。
注: 正しく選択するたびに 1 ポイントの価値があります。

次の要件を満たすようにポリシーを構成する必要があります。
共通添付ファイルフィルターをカスタマイズします。
送信者ドメインの偽装保護を有効にします。
各要件に対してどのタイプのポリシーを構成する必要がありますか?回答するには、適切なポリシー タイプを正しい要件にドラッグします。各ポリシー タイプは、1 回だけ使用することも、複数回使用することも、まったく使用しないこともできます。コンテンツを表示するには、ペイン間で分割バーをドラッグするか、スクロールする必要がある場合があります。
注: 正しく選択するたびに 1 ポイントの価値があります。
正解:
Explanation:
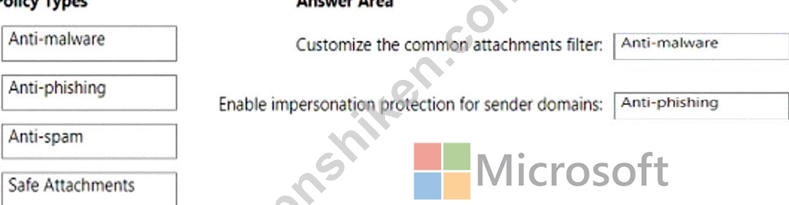
Box 1: Anti-malware
Customize the common attachments filter.
See step 5 below.
1. Use the Microsoft 365 Defender portal to create anti-malware policies In the Microsoft 365 Defender portal at https://security.microsoft.com, go to Email & Collaboration > Policies
& Rules > Threat policies > Anti-Malware in the Policies section. To go directly to the Anti-malware page, use https://security.microsoft.com/antimalwarev2
2. On the Anti-malware page, select Create to open the new anti-malware policy wizard.
On the Name your policy page, configure these settings:
Name: Enter a unique, descriptive name for the policy.
Description: Enter an optional description for the policy.
3. When you're finished on the Name your policy page, select Next.
4. On the Users and domains page, identify the internal recipients that the policy applies to (recipient conditions)
5. On the Protection settings page, configure the following settings:
Protection settings section:
Enable the common attachments filter: If you select this option, messages with the specified attachments are treated as malware and are automatically quarantined. You can modify the list by clicking Customize file types and selecting or deselecting values in the list.
6. Etc.
Box 2: Anti-phishing
Enable impersonation protection for sender domains.
Anti-phishing policies in Microsoft 365
The high-level differences between anti-phishing policies in EOP and anti-phishing policies in Defender for Office 365 are described in the following table:
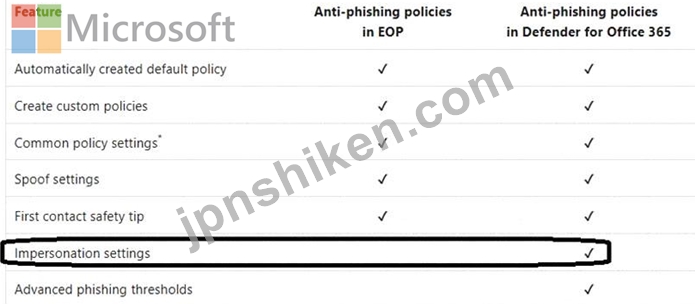
Reference:
https://learn.microsoft.com/en-us/microsoft-365/security/office-365-security/anti-malware-policies-configure
https://learn.microsoft.com/en-us/microsoft-365/security/office-365-security/anti-phishing-policies-about

- 質問一覧「225問」
- 質問1 User1 という名前のユーザーと Site1 という名前の Microsoft Sh...
- 質問2 注: この質問は、同じシナリオを示す一連の質問の一部です。この...
- 質問3 ホットスポット Microsoft 365 サブスクリプションをお持ちです...
- 質問4 Microsoft 365 E5 サブスクリプションをお持ちです。 Microsoft ...
- 質問5 Microsoft 365 のインシデントと勧告を毎月確認する必要がありま...
- 質問6 Microsoft 365 テナントがあります。 Microsoft Defender XDR を...
- 質問7 セキュリティ管理者にソリューションを推奨する必要があります。
- 質問8 注: この質問は、同じシナリオを示す一連の質問の一部です。この...
- 質問9 Microsoft 365 E5 テナントがあります。 業界規制により、テナン...
- 質問10 次の表に示すグループを含む Microsoft 365 E5 サブスクリプショ...
- 質問11 Microsoft 365 サブスクリプションをお持ちです。 すべてのユー...
- 質問12 Azure AD テナントがあります。 Windows 10 Pro を実行し、Azure...
- 質問13 次の表に示すユーザーを含む Microsoft 365 E5 サブスクリプショ...
- 質問14 Microsoft 365 Defender を使用する Microsoft 365 サブスクリプ...
- 質問15 Microsoft 365 サブスクリプションをお持ちです。 onmicrosoft.c...
- 質問16 次の表に示す使用が含まれる Microsoft 365 ES サブスクリプショ...
- 質問17 ログ分析の技術要件を満たす必要があります。 Microsoft Cloud A...
- 質問18 ホットスポット 次の表に示すユーザーを含む contoso.com という...
- 質問19 Microsoft 365 E5 サブスクリプションをお持ちです。管理者には ...
- 質問20 あなたの会社は Microsoft 365 E5 サブスクリプションを持ってい...
- 質問21 次の表に示すユーザーを含む Microsoft 365 E5 サブスクリプショ...
- 質問22 注: この質問は、同じシナリオを示す一連の質問の一部です。この...
- 質問23 注: このセクションには、同じシナリオと問題に関する 1 つ以上...
- 質問24 contoso.com という名前の Azure AD テナントを使用する Microso...
- 質問25 オンプレミス ネットワークには、Contoso.com という名前の Acti...
- 質問26 あなたの会社には、contoso.com という名前の Azure AD テナント...
- 質問27 ホットスポット Group1 という名前の Microsoft 365 グループを...
- 質問28 コンプライアンス要件を満たすには、条件付きアクセス ポリシー
- 質問29 Microsoft 365 E5 テナントがあります。 次の図に示すように、デ...
- 質問30 Azure AD Identity Protection の週次ダイジェスト電子メールを...
- 質問31 あなたは Contoso, Ltd. という名前の会社で働いています。 Cont...
- 質問32 ホットスポット Microsoft 365 テナントがあります。 保持ラベル...
- 質問33 次の表に示すユーザーを含む Microsoft 365 サブスクリプション...
- 質問34 Microsoft 365 E5 サブスクリプションをお持ちです。 ユーザーが...
- 質問35 注: この質問は、同じシナリオを示す一連の質問の一部です。この...
- 質問36 User2 が監査ログを確認できることを確認する必要があります。ソ...
- 質問37 次の図に示すように、ネットワークには Azure AD に同期されるオ...
- 質問38 ネットワークには、Azure AD と同期されている adatum.com とい...
- 質問39 Microsoft 365 サブスクリプションをお持ちです。 一部の外部ユ...
- 質問40 Microsoft 365 E5 サブスクリプションをお持ちです。 すべてのユ...
- 質問41 どのサーバーで Defender for ID センサーを使用する必要があり...
- 質問42 Microsoft 365 E5 テナントがあります。 次の要件を満たす監視ソ...
- 質問43 500 台の Windows 10 デバイスと Microsoft エンドポイント マネ...
- 質問44 注: この質問は、同じシナリオを示す一連の質問の一部です。この...
- 質問45 ホットスポット Microsoft Defender for Endpoint を使用し、次...
- 質問46 Microsoft 365 E5 サブスクリプションをお持ちです。 ユーザーは...
- 質問47 Microsoft 365 Enterprise E5 サブスクリプションを持っています...
- 質問48 Microsoft 365 テナントがあります。 Microsoft Intune にデバイ...
- 質問49 User1 と User2 という名前の 2 人のユーザーを含む Microsoft 3...
- 質問50 Project1 に必要なプロセスを評価しています。 プロジェクトのド...
- 質問51 Contoso.com という名前の Microsoft Azure Active Directory (A...
- 質問52 User1 という名前のユーザーを含む Microsoft 365 E5 サブスクリ...
- 質問53 Microsoft 365 サブスクリプションをお持ちです。 データ損失防...
- 質問54 注: この質問は、同じシナリオを示す一連の質問の一部です。この...
- 質問55 注: この質問は、同じシナリオを示す一連の質問の一部です。この...
- 質問56 ホットスポット Microsoft 365 E5 サブスクリプションをお持ちで...
- 質問57 ホットスポット あなたの会社には Microsoft 365 E5 サブスクリ...
- 質問58 技術要件を満たすようにジャスト イン タイム アクセスを構成す...
- 質問59 ホットスポット Microsoft 365 テナントを作成します。 次の図に...
- 質問60 Device1 という名前の Windows 10 デバイスと、次の表に示す Mic...
- 質問61 Microsoft 365 E5 サブスクリプションをお持ちです。 次の図に示...
- 質問62 Microsoft 365 E5 サブスクリプションをお持ちです。 次の要件を...
- 質問63 Microsoft 365 ES サブスクリプションをお持ちです。 Microsoft ...
- 質問64 あなたの会社にはオンプレミス サーバーと Azure AD テナントが...
- 質問65 Intune の技術要件と計画された変更を満たす必要があります。 あ...
- 質問66 ネットワークには 3 つの Active Directory フォレストが含まれ...
- 質問67 ホットスポット Site1 という名前の Microsoft SharePoint Onlin...
- 質問68 ホットスポット Site1 という名前の Microsoft SharePoint Onlin...
- 質問69 Microsoft 365 E5 テナントがあります。 機密ラベルを構成します...
- 質問70 Microsoft Intune に登録された 500 台の Android デバイスを含...
- 質問71 ホットスポット Microsoft 365 E3 サブスクリプションをお持ちで...
- 質問72 User1 という名前のユーザーを含む Microsoft 365 サブスクリプ...
- 質問73 ホットスポット 新しい Microsoft 365 E5 テナントがあります。 ...
- 質問74 ホットスポット ネットワークには、contoso.com という名前のオ...
- 質問75 Microsoft Defender for Endpoint を使用する Microsoft 365 E5 ...
- 質問76 Microsoft 365 E5 サブスクリプションをお持ちです。 次の表に示...
- 質問77 Microsoft Defender for Cloud Apps を使用する Microsoft 365 E...
- 質問78 ホットスポット (Exhibit) SP800 評価には、次の表に示す改善ア...
- 質問79 次のアクティブな電子情報開示ケースを含む Microsoft 365 E5 サ...
- 質問80 Microsoft J65 E5 サブスクリプションをお持ちです。 Microsoft ...
- 質問81 次の図に示すグループを含む Microsoft 365 E5 サブスクリプショ...
- 質問82 注: この質問は、同じシナリオを示す一連の質問の一部です。この...
- 質問83 Microsoft 365 E5 テナントがあります。 機密の個人データを含む...
- 質問84 Microsoft 365 テナントがあります。 Microsoft Intune に登録す...
- 質問85 Microsoft Defender for Cloud Apps を使用する Microsoft 365 E...
- 質問86 ドラッグドロップ Microsoft 365 サブスクリプションをお持ちで...
- 質問87 Microsoft Defender for Office 365 を使用し、Mailbox1 という...
- 質問88 ホットスポット User1 という名前のユーザーを含む Microsoft 36...
- 質問89 オンプレミス ネットワークには Active Directory ドメインが含...
- 質問90 Microsoft 365 サブスクリプションをお持ちです。 次の表に示す...
- 質問91 Microsoft 365 E5 テナントがあります。 ユーザーは次の場所にデ...
- 質問92 エンドポイント セキュリティを使用する Microsoft 365 E5 サブ...
- 質問93 次の表に示すユーザーを含む Microsoft 365 E5 サブスクリプショ...
- 質問94 Microsoft 365 E5 サブスクリプションをお持ちです。 貴社の Mic...
- 質問95 Microsoft 365 サブスクリプションをお持ちです。 いくつかの Mi...
- 質問96 ホットスポット あなたの会社では、100 人のユーザーを含む従来...
- 質問97 Microsoft 365 サブスクリプションをお持ちです。 導入スコアを...
- 質問98 User1 という名前のユーザーを含む Microsoft 365 E5 サブスクリ...
- 質問99 次の表に示すデバイス コンプライアンス ポリシーがあります。 (...
- 質問100 あなたの会社には Microsoft 365 テナントがあります Engineerin...
- 質問101 注: この質問は、同じシナリオを示す一連の質問の一部です。この...
- 質問102 2,000 人を超えるゲスト ユーザーを含む Microsoft 365 サブスク...
- 質問103 Microsoft Defender for Endpoint と Microsoft Intune を使用す...
- 質問104 Microsoft 365 サブスクリプションをお持ちです。 次の図に示す...
- 質問105 Site1 という名前の SharePoint サイトを含む Microsoft 365 E5 ...
- 質問106 ホットスポット Admin1 と Admin2 という名前の 2 人のユーザー...
- 質問107 あなたの会社では Microsoft Defender for Endpoint を使用して...
- 質問108 Microsoft Defender for Office 365 を使用する Microsoft 365 ...
- 質問109 Windows 10 バージョン 2004 がプレインストールされている新し...
- 質問110 Microsoft 365 E5 サブスクリプションをお持ちです。 contoso.co...
- 質問111 次の図に示す公開された機密ラベルを持つ Microsoft 365 E5 サブ...
- 質問112 Microsoft 365 E5 テナントがあります。 ISO 27001:2013 テンプ...
- 質問113 Group1 と Group2 という 2 つのセキュリティ グループを含む Mi...
- 質問114 次の表に示すグループを含む Microsoft 365 テナントがあります...
- 質問115 Microsoft 365 テナントと LinkedIn 会社ページがあります。 Lin...
- 質問116 Microsoft 365 E5 サブスクリプションをお持ちです。 アプリケー...
- 質問117 ホットスポット ネットワークには、fabrikam.com という名前の A...
- 質問118 あなたの会社は、App1 という名前のクラウド アプリを購入します...
- 質問119 Microsoft 365 サブスクリプションをお持ちです。 レポートを確...
- 質問120 Sitel という名前の Microsoft SharePoint サイトを含む Microso...
- 質問121 Microsoft Defender for Endpoint を使用します。 次の表に示す ...
- 質問122 ホットスポット Microsoft 365 テナントがあります。 次の図に示...
- 質問123 Microsoft Defender for Office 365 を使用する Microsoft 365 ...
- 質問124 contoso.com という名前の Azure AD テナントを含む Microsoft 3...
- 質問125 Microsoft 365 サブスクリプションをお持ちです。 次の要件を満...
- 質問126 Microsoft Defender for Office 365 を使用する Microsoft 365 ...
- 質問127 次の表に示すコンプライアンス ポリシーを含む Microsoft 365 テ...
- 質問128 Microsoft 365 E5 サブスクリプションをお持ちです。 次の要件を...
- 質問129 Microsoft 365 サブスクリプションをお持ちです。 Microsoft Pur...
- 質問130 Microsoft Intune が含まれる Microsoft 365 サブスクリプション...
- 質問131 Microsoft 365 E5 サブスクリプションがあります。サブスクリプ...
- 質問132 contoso.com という名前の Microsoft Entra テナントにリンクさ...
- 質問133 Microsoft 365 E5 サブスクリプションをお持ちです。 SecAdmin1 ...
- 質問134 次の表に示すデバイスを含む Microsoft 365 E5 サブスクリプショ...
- 質問135 Microsoft Defender XDR を使用する Microsoft 365 サブスクリプ...
- 質問136 Microsoft E5 サブスクリプションをお持ちです。 Microsoft Exch...
- 質問137 Azure Sentinel と Microsoft Cloud App Security を使用する予...
- 質問138 Azure サブスクリプションとオンプレミスの Active Directory ド...
- 質問139 ネットワークには Contoso という名前の Active Directory フォ...
- 質問140 外部ユーザーとのクレジット カード情報の共有を保護するデータ
- 質問141 Office 365 サービスのステータス通知を構成し、サービスと機能...
- 質問142 Microsoft 365 E5 サブスクリプションをお持ちです。 グループの...
- 質問143 サポート技術者がモントリオール オフィスのモバイル デバイスの...
- 質問144 Microsoft 365 テナントがあります。 Microsoft 365 セキュリテ...
- 質問145 次の表に示すユーザーを含む Microsoft 365 E5 サブスクリプショ...
- 質問146 ホットスポット Microsoft 365 E5 サブスクリプションをお持ちで...
- 質問147 contoso.onmicrosoft.com という名前の Azure Active Directory ...
- 質問148 あなたの会社には複数のオフィスがあります。 デバイス管理に Mi...
- 質問149 ホットスポット 会社では Microsoft Defender for Endpoint を使...
- 質問150 ホットスポット 次の表のユーザーを含む Microsoft 365 サブスク...
- 質問151 Microsoft 365 E5 サブスクリプションがあり、Microsoft Defende...
- 質問152 Microsoft 365 サブスクリプションをお持ちです。 Microsoft 365...
- 質問153 Microsoft 36S E5 サブスクリプションをお持ちです。 次の表に示...
- 質問154 1,000 台の Windows 10 デバイスを含む Microsoft 365 テナント...
- 質問155 技術要件を満たすようにコンプライアンス設定を構成する必要があ
- 質問156 500 台の Windows 10 デバイスと Microsoft Endpoint Manager デ...
- 質問157 Microsoft 365 ES サブスクリプションをお持ちです。 Microsoft ...
- 質問158 次の表に示すように、Microsoft Intune に登録された 5 台のデバ...
- 質問159 100 台の Windows 10 デバイスを含む Microsoft 365 E5 テナント...
- 質問160 次のユーザーを含む Microsoft 365 E5 サブスクリプションがあり...
- 質問161 User1 という名前のユーザーを含む Microsoft 365 E5 サブスクリ...
- 質問162 500 台の Windows 10 デバイスを含む Microsoft 365 E5 テナント...
- 質問163 Microsoft 365 サブスクリプションをお持ちです。 contoso.com ...
- 質問164 ホットスポット 次の表に示すユーザーを含む Microsoft 365 E5 ...
- 質問165 Microsoft 365 E5 サブスクリプションをお持ちです。 次の要件を...
- 質問166 Microsoft 365 E5 サブスクリプションをお持ちです。 すべてのデ...
- 質問167 ホットスポット Site1 という名前の Microsoft SharePoint サイ...
- 質問168 次の表に示すデバイスを含む Microsoft 365 E5 サブスクリプショ...
- 質問169 Microsoft 365 サブスクリプションをお持ちです。 Microsoft Exc...
- 質問170 Microsoft 36S E5 サブスクリプションをお持ちです。 Group1 と...
- 質問171 Contoso.com という名前の Microsoft Azure Active Directory (A...
- 質問172 Microsoft 365 E5 サブスクリプションをお持ちです。 あなたは、...
- 質問173 Microsoft 365 E5 サブスクリプションをお持ちです。 サブスクリ...
- 質問174 Microsoft 365 Defender ポータルでアラートを確認しています。 ...
- 質問175 Microsoft 365 E5 サブスクリプションをお持ちです。サブスクリ...
- 質問176 Microsoft 365 E5 サブスクリプションをお持ちです。 次の図に示...
- 質問177 注: この質問は、同じシナリオを示す一連の質問の一部です。この...
- 質問178 ビジネス向け Microsoft ストアを作成する必要があります。どの...
- 質問179 次の表に示すユーザーを含む Microsoft 365 E5 サブスクリプショ...
- 質問180 100 台の Windows 10 デバイスを含む Microsoft 365 E5 テナント...
- 質問181 Azure Active Directory (Azure AD) で [セキュリティの有効化] ...
- 質問182 Microsoft 365 テナントがあります。 Endpoint Protection デバ...
- 質問183 次の表に示すユーザーを含む Azure AD テナントがあります。 (Ex...
- 質問184 SharePoint 管理者の技術要件を満たす必要があります。あなたは...
- 質問185 ホットスポット 次の表に示すユーザーを含む Microsoft 365 E5 ...
- 質問186 デバイス管理に Microsoft エンドポイント マネージャーを使用す...
- 質問187 Microsoft Purview コンプライアンス ポータルから、Policy 1 と...
- 質問188 ネットワークには、contoso.com という名前のオンプレミスの Act...
- 質問189 Microsoft 365 サブスクリプションをお持ちです。 User1 という...
- 質問190 監査が有効になっている Microsoft 365 E5 サブスクリプションが...
- 質問191 注: この質問は、同じシナリオを示す一連の質問の一部です。この...
- 質問192 Microsoft Intune を使用し、次の表に示すデバイスが含まれる Mi...
- 質問193 次の図に示す機密ラベルがあります。 (Exhibit) ユーザーはコン...
- 質問194 Microsoft 365 E5 テナントがあります。 クレジット カード番号...
- 質問195 User1 という名前のユーザーを含む Microsoft 365 E5 テナントが...
- 質問196 次の表に示すユーザーを含む Microsoft 365 サブスクリプション...
- 質問197 ホットスポット ネットワークには、オンプレミスの Active Direc...
- 質問198 次の表に示すデバイスを含む Microsoft 365 E5 テナントがありま...
- 質問199 Microsoft 365 E5 サブスクリプションがあり、その中に user1@co...
- 質問200 Microsoft 365 E5 サブスクリプションと contoso.com という名前...
- 質問201 Microsoft 365 サブスクリプションをお持ちです。 すべてのユー...
- 質問202 Microsoft 365 E5 サブスクリプションをお持ちです。 ユーザーの...
- 質問203 モバイル デバイス管理用に登録されたデバイスを含む Microsoft ...
- 質問204 次の表に示すデバイスを含む Microsoft 365 E5 サブスクリプショ...
- 質問205 次の表に示すグループを含む Microsoft 365 E5 サブスクリプショ...
- 質問206 次の表に示すように、Microsoft エンドポイント マネージャーに ...
- 質問207 Microsoft 365 テナントがあります。 会社のポリシーでは、すべ...
- 質問208 あなたの会社には Microsoft 365 E5 テナントがあります。 会社...
- 質問209 Microsoft 365 E5 サブスクリプションをお持ちです。 すべての企...
- 質問210 営業部門のすべてのユーザーが Project1 と Project2 中に正常に...
- 質問211 Microsoft Intune に登録された 1,000 台の iOS デバイスを含む ...
- 質問212 adatum.com というドメイン名を使用する Microsoft 365 サブスク...
- 質問213 Azure AD テナントと Microsoft 365 E5 サブスクリプションがあ...
- 質問214 次の図に示すように、DLP1 という名前のデータ損失防止 (DLP) ポ...
- 質問215 Microsoft Defender for Office 365 を使用する Microsoft 365 E...
- 質問216 ネットワークには、contoso.com という名前のオンプレミスの Act...
- 質問217 注: この質問は、同じシナリオを示す一連の質問の一部です。この...
- 質問218 次の表に示すユーザーを含む Microsoft 365 E5 サブスクリプショ...
- 質問219 Intune で自動登録を構成する必要があります。ソリューションは...
- 質問220 注: この質問は、同じシナリオを示す一連の質問の一部です。この...
- 質問221 あなたの会社は 5 つの都市にオフィスを構えています。 会社には...
- 質問222 次の図に示すグループを含む Microsoft Entra テナントがありま...
- 質問223 Windows 10 デバイスのコンプライアンス要件を満たす必要があり...
- 質問224 Microsoft 365 サブスクリプションをお持ちです。 次の表に示す...
- 質問225 Microsoft 365 テナントがあります。 Microsoft 365 セキュリテ...
