- ホーム
- Microsoft
- AZ-800J - Administering Windows Server Hybrid Core Infrastructure (AZ-800日本語版)
- Microsoft.AZ-800J.v2024-07-23.q119
- 質問114
有効的なAZ-800J問題集はJPNTest.com提供され、AZ-800J試験に合格することに役に立ちます!JPNTest.comは今最新AZ-800J試験問題集を提供します。JPNTest.com AZ-800J試験問題集はもう更新されました。ここでAZ-800J問題集のテストエンジンを手に入れます。
AZ-800J問題集最新版のアクセス
「269問、30% ディスカウント、特別な割引コード:JPNshiken」
ドラッグ アンド ドロップの質問
Windows Server を実行する Server1 という名前の Azure 仮想マシンを作成します。
Server1 のディスク構成は次のとおりです。

Server1 に新しい 100 GB ボリュームを作成する必要があります。
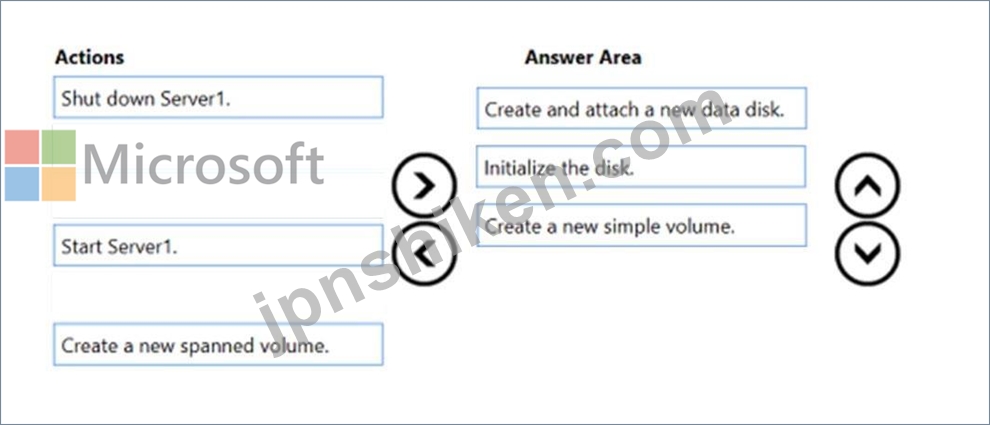
どの 3 つのアクションを順番に実行する必要がありますか?回答するには、アクションのリストから適切なアクションを回答領域に移動し、正しい順序で並べます。

Windows Server を実行する Server1 という名前の Azure 仮想マシンを作成します。
Server1 のディスク構成は次のとおりです。
Server1 に新しい 100 GB ボリュームを作成する必要があります。
どの 3 つのアクションを順番に実行する必要がありますか?回答するには、アクションのリストから適切なアクションを回答領域に移動し、正しい順序で並べます。
正解:
Explanation:
Step 1: Create and attach a new data disk
Add a data disk.
1. Sign in to the Azure portal.
2. Search for and select Virtual machines.
3. Select a virtual machine from the list.
4. On the Virtual machine pane, select Disks.
5. On the Disks pane, select Create and attach a new disk.
6. In the drop-downs for the new disk, make the selections you want, and name the disk.
7. Select Save to create and attach the new data disk to the VM.
Step 2: Initialize the disk
Initialize a new data disk.
1. Connect to the VM.
2. Select the Windows Start menu inside the running VM and enter diskmgmt.msc in the search box. The Disk Management console opens.
3. Disk Management recognizes that you have a new, uninitialized disk and the Initialize Disk window appears.
4. Verify the new disk is selected and then select OK to initialize it.
5. The new disk appears as unallocated. Right-click anywhere on the disk and select New simple volume. The New Simple Volume Wizard window opens.
6. Etc.
Step 3: Create a new simple volume
Reference:
https://docs.microsoft.com/en-us/azure/virtual-machines/windows/attach-managed-disk-portal

- 質問一覧「119問」
- 質問1 ホットスポットの質問 ユーザー設定のみを含む GPO1 という名前...
- 質問2 ネットワークには Active Directory ドメイン サービス (AD DS) ...
- 質問3 シミュレーション SRV1 上の C:\app という名前のフォルダーにコ...
- 質問4 ドラッグ アンド ドロップの質問 Windows Server を実行する Ser...
- 質問5 シミュレーション share1 という名前の Azure ファイル共有がオ...
- 質問6 ホットスポットの質問 次の図に示すように、ネットワークには 2 ...
- 質問7 ホットスポットの質問 オンプレミス ネットワークには、Active D...
- 質問8 ネットワークには、contoso.com という名前の Active Directory ...
- 質問9 ネットワークには、contoso.com という名前の Active Directory ...
- 質問10 注: この質問は、同じシナリオを提示する一連の質問の一部です。...
- 質問11 ユーザーが Azure AD Connect Health 内で電子メール通知などの...
- 質問12 ネットワークには Active Directory ドメイン サービス (AD DS) ...
- 質問13 ホットスポットの質問 ネットワークには、adatum.com という名前...
- 質問14 ドラッグ アンド ドロップの質問 Windows Server を実行し、Hype...
- 質問15 Azure AD と同期するオンプレミスの Active Directory Domain Se...
- 質問16 Azure Active Directory (Azure AD) テナントと同期するオンプレ...
- 質問17 オンプレミス ネットワークの IP アドレス範囲は 10.0.0.0/23 で...
- 質問18 ホットスポットの質問 ネットワークには Active Directory ドメ...
- 質問19 注: この質問は、同じシナリオを示す一連の質問の一部です。この...
- 質問20 ホットスポットの質問 次の表に示すように、Windows Server を実...
- 質問21 Windows Server を実行する VM1 という名前の Azure 仮想マシン...
- 質問22 シミュレーション グループ ポリシー設定を使用して、\\dc1.cont...
- 質問23 Azure Active Directory (Azure AD) テナントと同期するオンプレ...
- 質問24 ドラッグ アンド ドロップの質問 ネットワークには、contoso.com...
- 質問25 シミュレーション DC2 が contoso.com のスキーマ マスターであ...
- 質問26 ホットスポットの質問 ネットワークには、次の表に示すセグメン
- 質問27 ホットスポットの質問 オンプレミス ネットワークには、contoso....
- 質問28 Windows Server を実行する VM1 という名前の Azure 仮想マシン...
- 質問29 ドラッグ アンド ドロップの質問 Windows Server を実行し、Hype...
- 質問30 ケーススタディ 1 - Fabrikam, Inc 概要 Fabrikam, Inc は、ニュ...
- 質問31 ホットスポットの質問 ネットワークには、Azure AD テナントと同...
- 質問32 ホットスポットの質問 ネットワークには、contoso.com という名...
- 質問33 DNS サーバーの役割がインストールされているサーバーがあります...
- 質問34 Windows Server 2022 を実行し、次の表に示すネットワーク アダ...
- 質問35 ネットワークには、Active Directory ドメイン サービス (AD DS)...
- 質問36 ネットワークには contoso.com という名前の Active Directory ...
- 質問37 ケーススタディ 3 – ADatum Corporation 概要 企業情報 ADatum ...
- 質問38 ホットスポットの質問 ネットワークには、contoso.com と fabrik...
- 質問39 注: この質問は、同じシナリオを示す一連の質問の一部です。この...
- 質問40 ホットスポットの質問 ネットワークには Active Directory ドメ...
- 質問41 ネットワークには Active Directory ドメイン サービス (AD DS) ...
- 質問42 Windows Server を実行する Server1 という名前のオンプレミス ...
- 質問43 ネットワークには Active Directory ドメイン サービス (AD DS) ...
- 質問44 シミュレーション 実行中の仮想マシンをダウンタイムなしで SRV1...
- 質問45 ケース スタディ 2 - Contoso, Ltd 概要 Contoso, Ltd. は、シア...
- 質問46 Azure Active Directory (Azure AD) テナントと同期するオンプレ...
- 質問47 ケーススタディ 3 – ADatum Corporation 概要 企業情報 ADatum ...
- 質問48 シミュレーション contoso.com に Admin1 という名前のユーザー...
- 質問49 ドラッグ アンド ドロップの質問 contoso.com という名前の新し...
- 質問50 シミュレーション シアトルのサイトで DC3 という名前のドメイン...
- 質問51 ネットワークには Active Directory ドメイン サービス (AD DS) ...
- 質問52 シミュレーション SRV1 を DNS サーバーとして構成する必要があ...
- 質問53 ケーススタディ 1 - Fabrikam, Inc 概要 Fabrikam, Inc は、ニュ...
- 質問54 シミュレーション fabrikam.com という名前の新しいプライマリ D...
- 質問55 ケース スタディ 2 - Contoso, Ltd 概要 Contoso, Ltd. は、シア...
- 質問56 .NET Core を必要とするコンテナー化されたアプリケーションをデ...
- 質問57 ホットスポットの質問 ネットワークには、contoso.com という名...
- 質問58 次の表に示す仮想ネットワークを含む Azure サブスクリプション...
- 質問59 ネットワークには、Active Directory ドメイン サービス (AD DS)...
- 質問60 ネットワークには、contoso.com という名前の Active Directory ...
- 質問61 注: この質問は、同じシナリオを示す一連の質問の一部です。この...
- 質問62 シミュレーション Azure File Sync を使用して、SRV1 上の C:\ap...
- 質問63 ホットスポットの質問 次の図に示すように、ネットワークには 3 ...
- 質問64 ホットスポットの質問 VNet1 という名前の仮想ネットワークを含...
- 質問65 次のリソースを含む Azure サブスクリプションがあります。 - Az...
- 質問66 ネットワークには Active Directory ドメイン サービス (AD DS) ...
- 質問67 シミュレーション Server Admins という名前の組織単位 (OU) 内...
- 質問68 Windows Server を実行する Server1 という名前のサーバーがあり...
- 質問69 ホットスポットの質問 Server1 という名前の Windows Server コ...
- 質問70 シミュレーション グループ管理サービス アカウント (gMSA) を作...
- 質問71 ホットスポットの質問 Server1 という名前の Windows Server コ...
- 質問72 ネットワークには Active Directory ドメイン サービス (AD DS) ...
- 質問73 ホットスポットの質問 次の図に示すように、ネットワークには 2 ...
- 質問74 ケーススタディ 3 – ADatum Corporation 概要 企業情報 ADatum ...
- 質問75 contoso.com という名前の Azure Active Directory Domain Servi...
- 質問76 オンプレミス ネットワークには、contoso.com という名前の Acti...
- 質問77 Hyper-V サーバーの役割がインストールされている 2 つのサーバ...
- 質問78 シミュレーション SRV1 で mcr.microsoft.com/windows/servercor...
- 質問79 シミュレーション ドメイン ユーザーが \\SRV1\Data という名前...
- 質問80 ホットスポットの質問 ネットワークには、adatum.com という名前...
- 質問81 注: この質問は、同じシナリオを提示する一連の質問の一部です。...
- 質問82 ネットワークには、contoso.com という名前の Active Directory ...
- 質問83 あなたは、既存のサーバー ファームからメンバー ホストを廃止す...
- 質問84 シミュレーション BranchAdmins グループのメンバーのパスワード...
- 質問85 次の表に示すストレージ アカウントを含む Azure サブスクリプシ...
- 質問86 ドラッグ アンド ドロップの質問 Windows Admin Center がインス...
- 質問87 ホットスポットの質問 ネットワークには、次の図に示すドメイン
- 質問88 Windows Server を実行し、Share1 という名前のファイル共有を含...
- 質問89 ネットワークに Active Directory Domain Services (AD DS) ドメ...
- 質問90 ケーススタディ 1 - Fabrikam, Inc 概要 Fabrikam, Inc は、ニュ...
- 質問91 シミュレーション SRV1 上の Windows Admin Center を使用して D...
- 質問92 ケーススタディ 1 - Fabrikam, Inc 概要 Fabrikam, Inc は、ニュ...
- 質問93 ホットスポットの質問 次の表に示すメンバー サーバーを含む Act...
- 質問94 Windows Server を実行する VM1 という名前の Azure 仮想マシン...
- 質問95 ドラッグ アンド ドロップの質問 Azure サブスクリプションをお...
- 質問96 ホットスポットの質問 オンプレミス ネットワークには、単一ドメ...
- 質問97 ドラッグ アンド ドロップの質問 非集約クラスター展開を行って...
- 質問98 Azure Active Directory (Azure AD) テナントと同期するオンプレ...
- 質問99 ネットワークには DHCP サーバーが含まれています。 新しいサブ...
- 質問100 Windows Server を実行し、UserData という名前の共有フォルダー...
- 質問101 Windows Server を実行し、次の構成を持つ VM1 という名前の Azu...
- 質問102 ホットスポットの質問 Windows Server を実行する Server1 とい...
- 質問103 注: この質問は、同じシナリオを示す一連の質問の一部です。この...
- 質問104 ホットスポットの質問 Windows Server を実行するオンプレミス ...
- 質問105 Windows Server を実行する VM1 という名前の Azure 仮想マシン...
- 質問106 シミュレーション Log Analytics ワークスペースの SRV1 から推...
- 質問107 ケース スタディ 2 - Contoso, Ltd 概要 Contoso, Ltd. は、シア...
- 質問108 シミュレーション Azure ファイル共有を同期するには、SRV1 を登...
- 質問109 ドラッグ アンド ドロップの質問 Windows Server を実行し、Acti...
- 質問110 ドラッグ アンド ドロップの質問 contoso.com という名前の単一...
- 質問111 ケース スタディ 2 - Contoso, Ltd 概要 Contoso, Ltd. は、シア...
- 質問112 シミュレーション Microsoft Defender for Cloud を使用して DC1...
- 質問113 Azure サブスクリプションをお持ちです。サブスクリプションには...
- 質問114 ドラッグ アンド ドロップの質問 Windows Server を実行する Ser...
- 質問115 VM1 Ilia という名前の Azure 仮想マシンがあります。プライベー...
- 質問116 ドラッグ アンド ドロップの質問 新しい Azure サブスクリプショ...
- 質問117 ケース スタディ 2 - Contoso, Ltd 概要 Contoso, Ltd. は、シア...
- 質問118 シミュレーション PowerShell を使用して SRV1 をリモートで管理...
- 質問119 シミュレーション SRV1 上のscope1 という名前の DHCP スコープ...
